• Donate
    • Donate
    • Member Circles and Benefits
    • Become a Member
    • Renew Today
    • Give a Gift Membership
    • Student Membership
  • Take Action
    • Volunteer Program
    • Make Your Voice Heard
  • About
    • Land Acknowledgment
    • What We Do
    • Position Papers
    • Team & People
    • Job Openings
    • Partners & Friends
    • Annual Reports
    • Policies & Financials
  • Things to Do
    • Events
    • Archaeology Café
    • Exhibits
    • Classes
    • Field School
  • Explore
    • Free Resources
    • Introduction to Southwestern Archaeology
    • Projects
    • Protection Efforts
    • Ancient Cultures
    • Videos
    • Places to Visit
  • Store
    • Archaeology Southwest Magazine
    • All Products
  • News
    • Blog
    • Press Releases/Announcements
    • Preservation Archaeology Today
    • Sign up for E-News
  • Donate
    • Donate
    • Member Circles and Benefits
    • Become a Member
    • Renew Today
    • Give a Gift Membership
    • Student Membership
  • Take Action
    • Volunteer Program
    • Make Your Voice Heard
X
  • About
    • Land Acknowledgment
    • What We Do
    • Position Papers
    • Team & People
    • Job Openings
    • Partners & Friends
    • Annual Reports
    • Policies & Financials
  • Things to Do
    • Events
    • Archaeology Café
    • Speakers Bureau
    • Exhibits
    • Classes
    • Field School
  • Explore
    • Free Resources
    • SW Archaeology 101
    • Projects
    • Protection Efforts
    • Ancient Cultures
    • Videos
    • Places to Visit
  • Store
    • Archaeology Southwest Magazine
    • All Products
  • News
    • Blog
    • Press Releases/Announcements
    • Preservation Archaeology Today
    • Sign up for E-News

Bug Bling! How to Make a Necklace out of Beetle Legs

Preservation Archaeology Blog
  • Home
  • >
  • Preservation Archaeology Blog
  • >
  • Bug Bling! How to Make a Necklace out of Beetle Le...
Allen Denoyer, Preservation Archaeologist and Ancient Technologies Expert
Allen Denoyer - blog

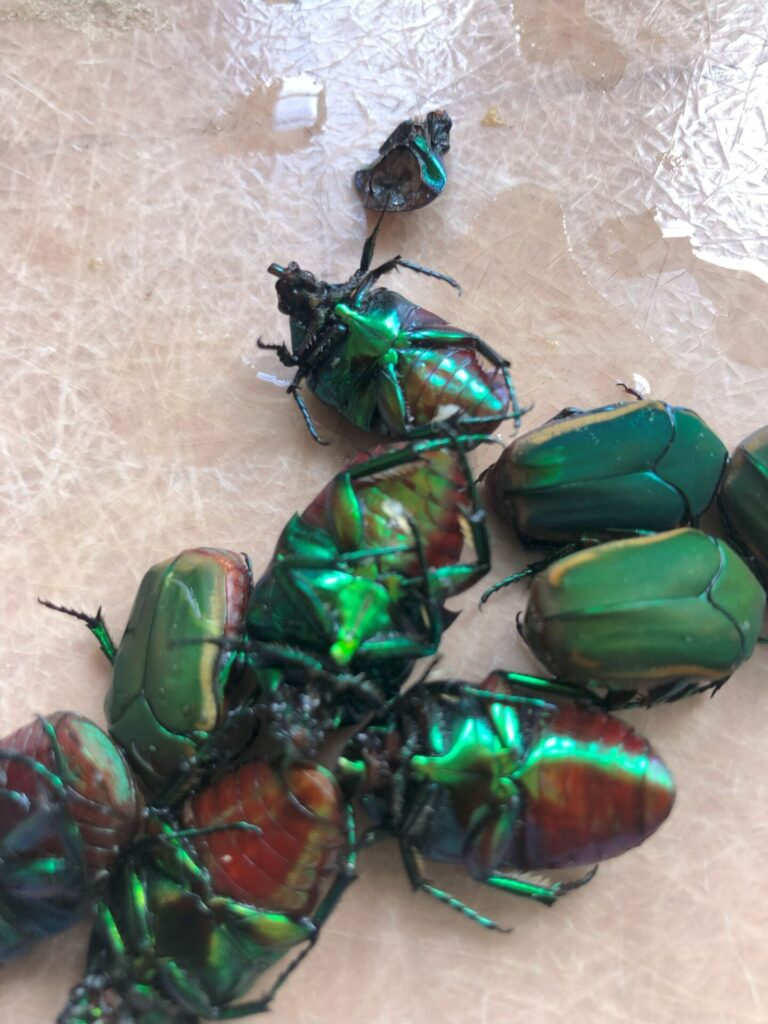
(September 28, 2023)—When I was visiting Mission Garden this past summer during the height of the fig harvest, I was amazed to see thousands of beetles eating ripe figs. I grew up calling these “June bugs,” but in the Southwest region, they are technically—wouldn’t you know it—Fig-eater beetles (Cotinis mutabilis)! These beetles love fruit and are also commonly found on ripened prickly pear fruit in July and August, during the summer monsoons.

Fig-eater beetle carcasses.

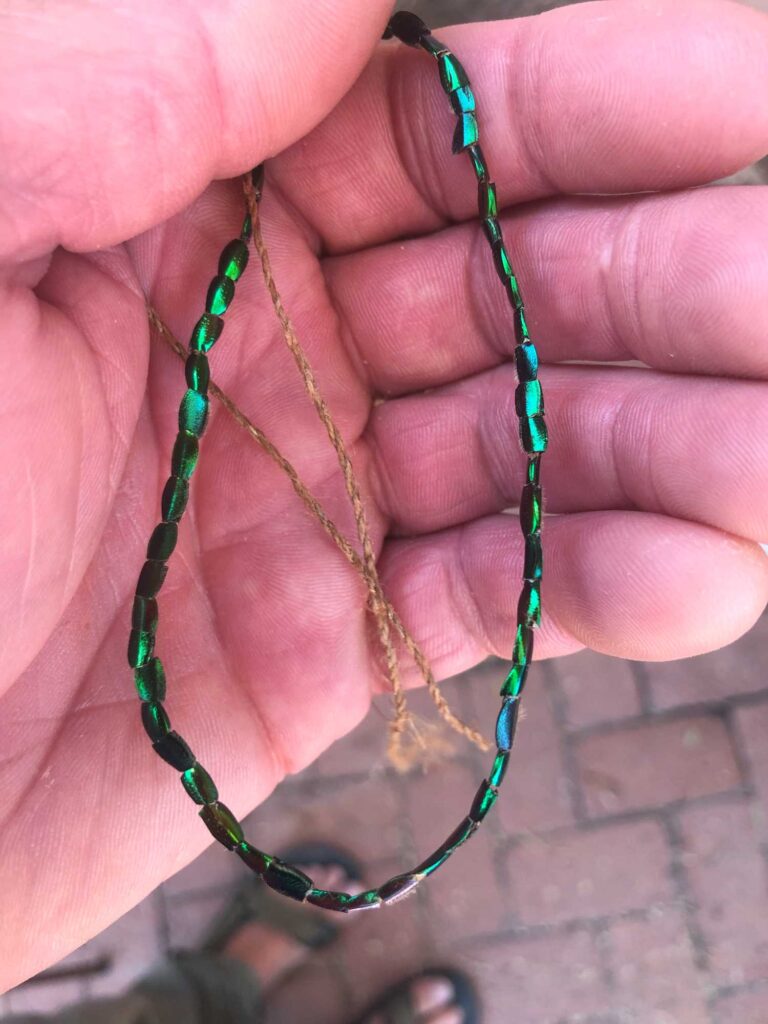
Seeing these iridescent green beauties reminded me of an article I’d recently read by Matt Stirn about Michael Terlep and colleagues’ research on two necklaces that had been found in rock shelters in Bears Ears National Monument and are currently in the collections of Edge of the Cedars State Park Museum. Those were made of parts of similar beetles, apparently Green June beetles (Cotinis nidita). I’m not aware of any such necklaces known from southern Arizona, but people may have made and worn them here, too—we just don’t have as many rock shelters in which they could have been preserved.

When I read the article, it had not really registered that the beads were made of the hind legs of similar beetles. But, seeing hordes of them at the garden, it clicked (pun intended).

Well, you know me—I had to give it a go and try to replicate beetle-leg bling!

Beetle in profile; notice the hind legs.

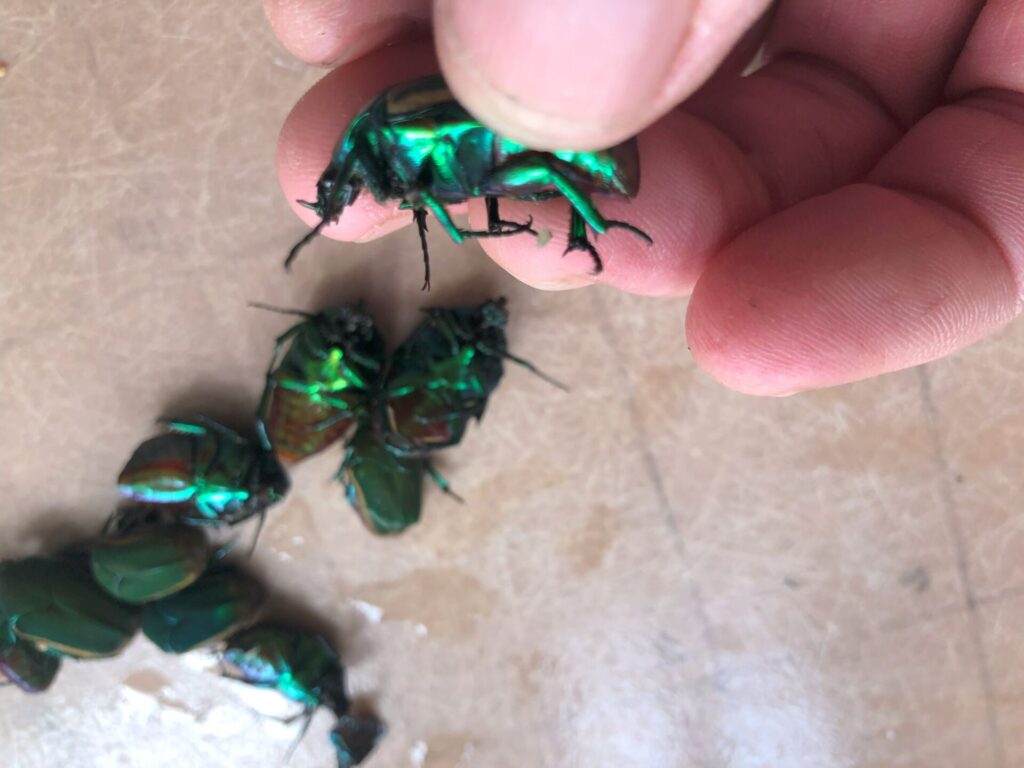
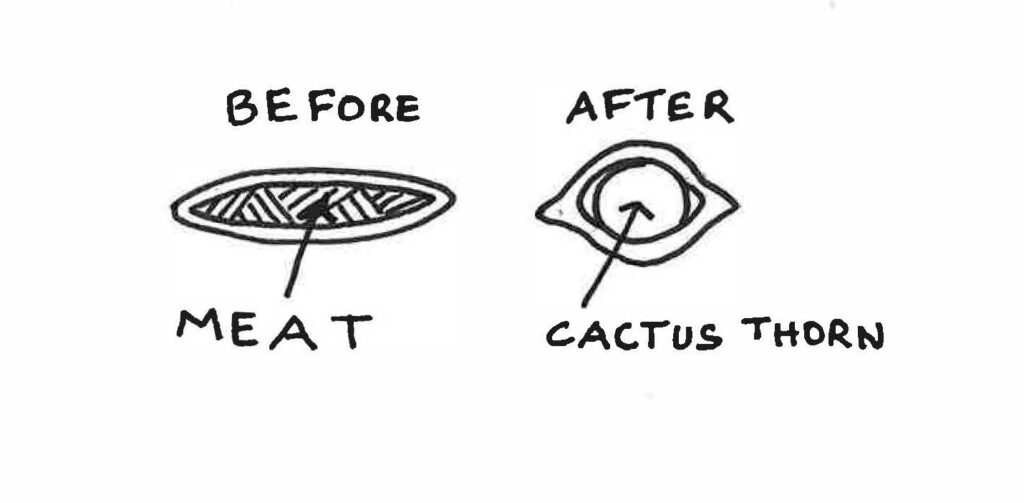
I went around Mission Garden and gathered as many dead beetles as I could. As soon as I realized that people had used the “femur”—which is tiny!—I knew I’d need to collect a lot of bugs. (Technically, beetles don’t have “femurs”; they have exoskeletons with meat and muscle on the inside. The beads were made of the beetles’ back legs, so that meant two beads per bug!)

Here are legs removed from the dead beetles, ready to be cut into beads.
Complete hind leg. Just two cuts produce a bead.
I drew a diagram to show you how to cut the legs into beads. Cut a little bit back from the proximal and distal ends of the femur. This will allow for a larger end to run your cordage through.

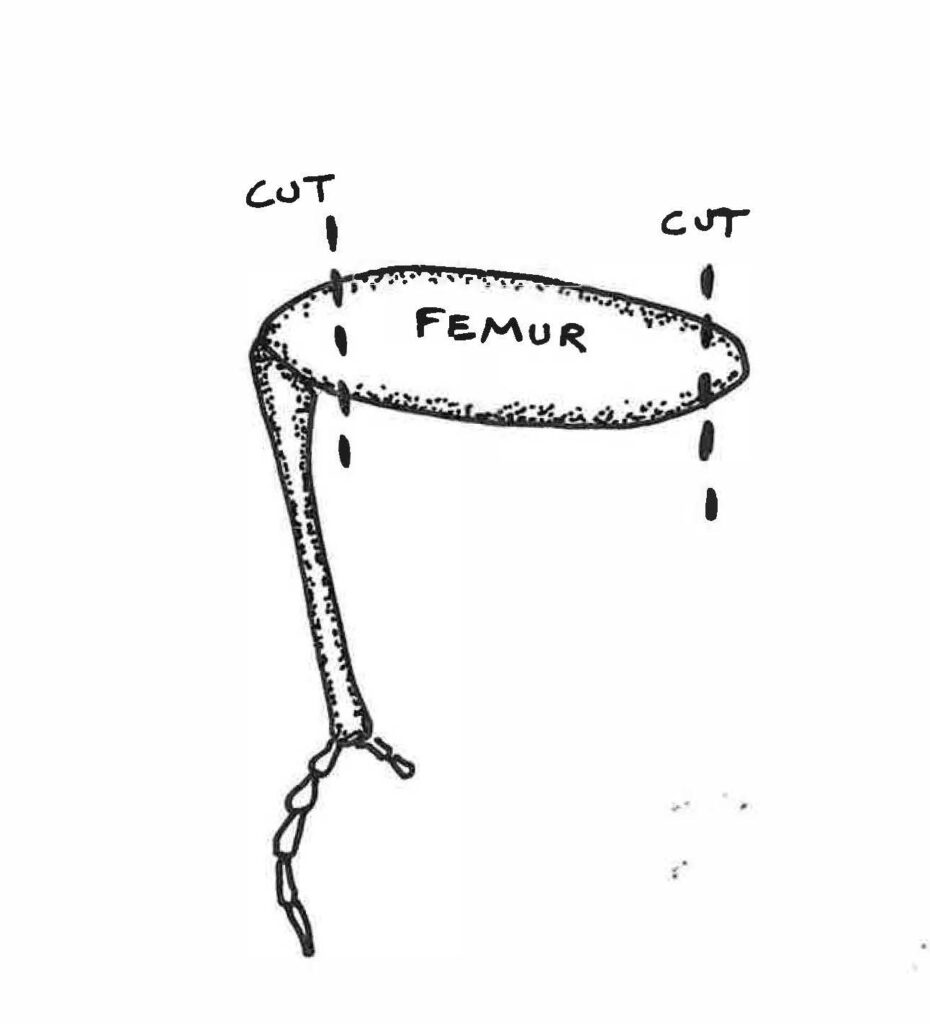
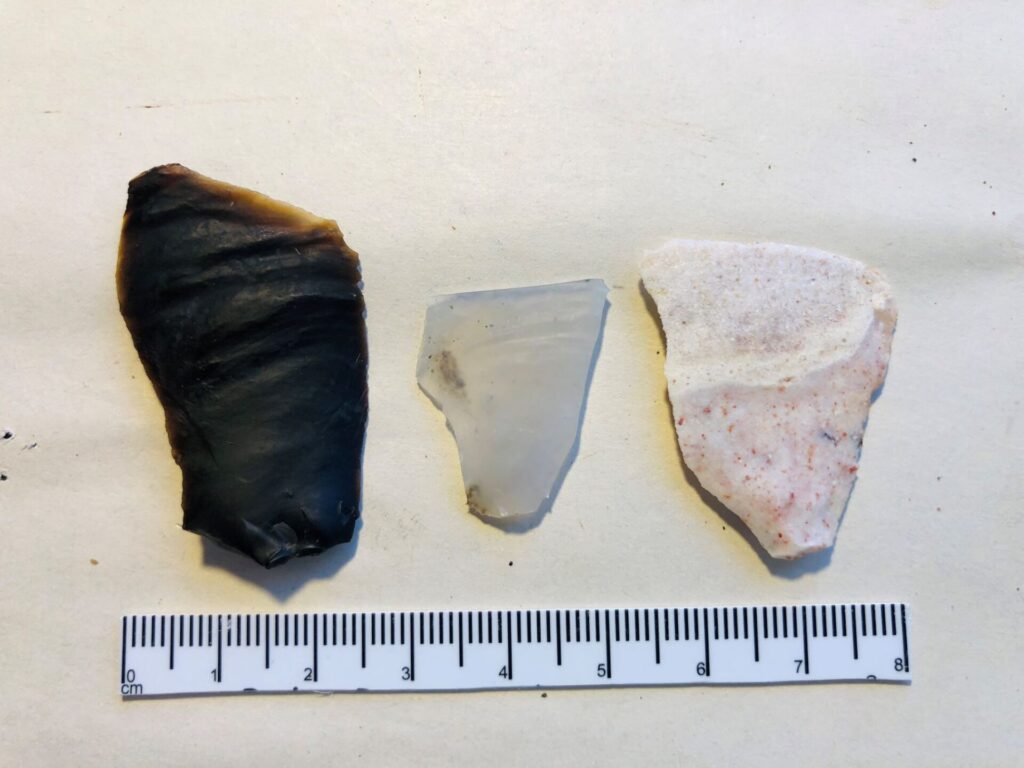
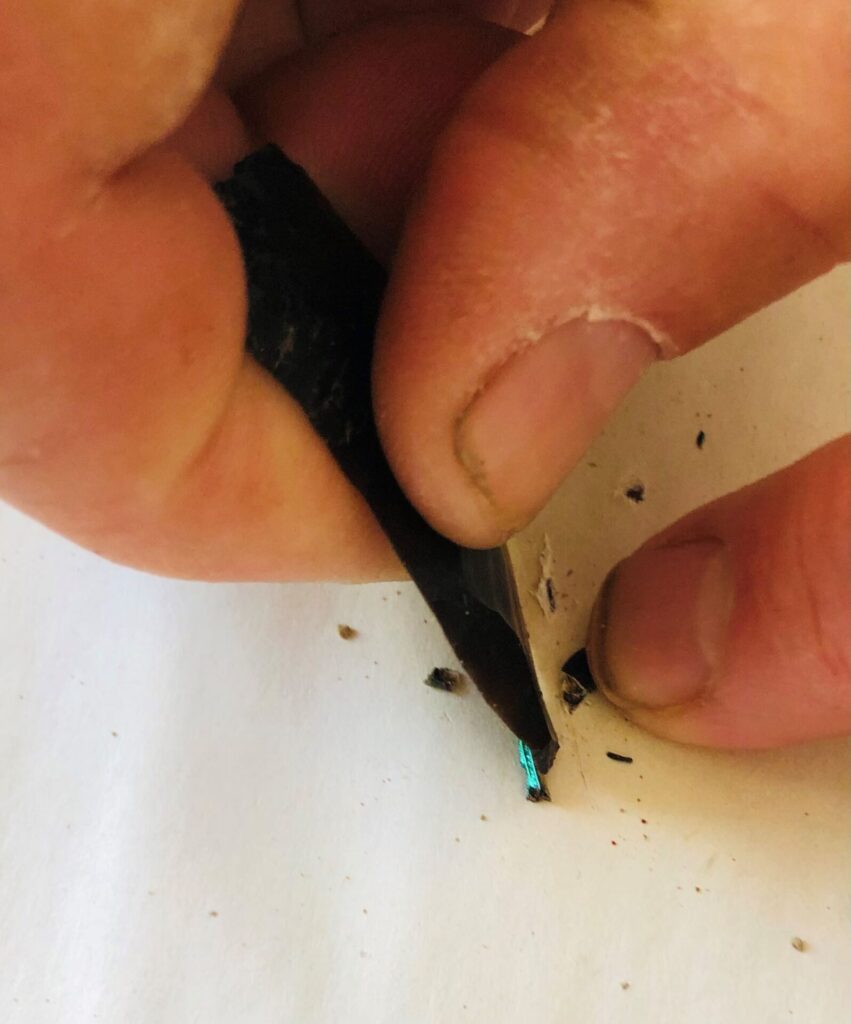
In order to do my best to replicate how I think people made these, I used biface thinning flakes as scalpels for cutting the ends of the leg segments off. I found that the flakes worked well and allowed me to cut hundreds of legs before the flake edges dulled.

My scalpels.
My scalpels.
Using a flake tool to make the cuts.

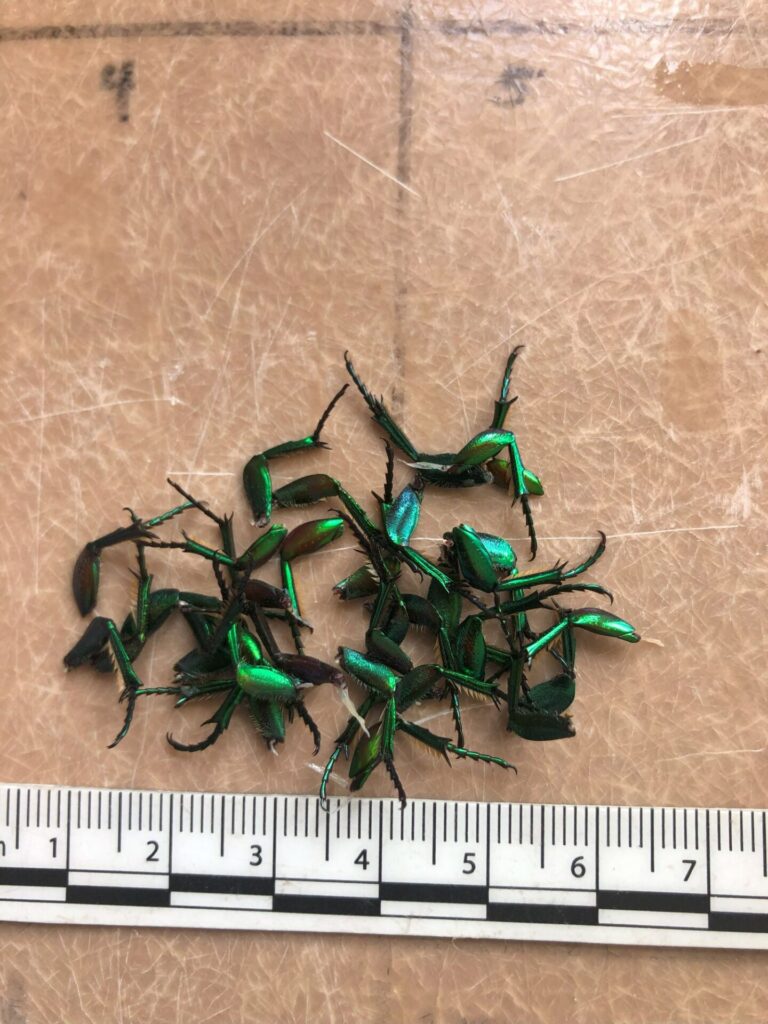
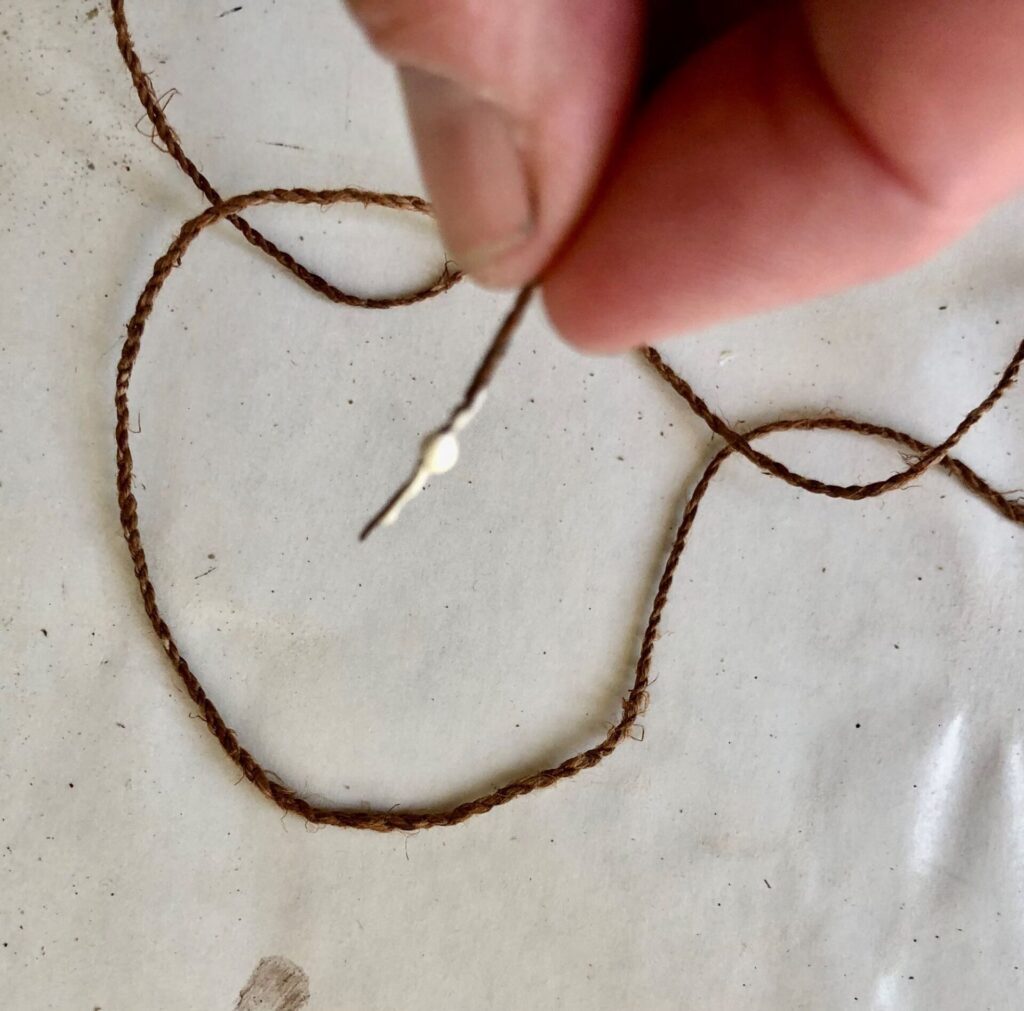
You’ll also need some cactus spines or thorns to stick the femurs on. This is so they open up and dry with a nice hole (perforation) down the middle. Size-wise, I found the thorns from the prickly pear cactus to be just right. (Here I did use modern pliers to pull the spines from dead cactus pads.)

Pliers are being used to pull spines from a dried pprickly peard pad.

Use the longest spines/thorns you can find, so you can put more leg segments on each thorn. I was able to run 3 to 10 beads on each thorn.

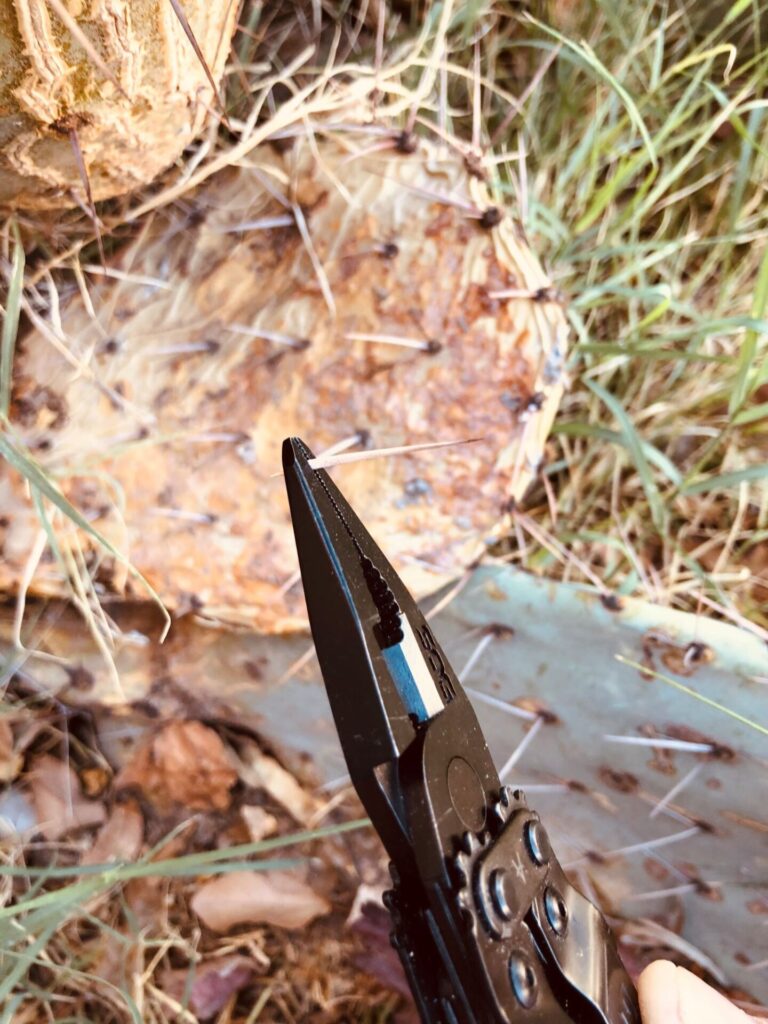
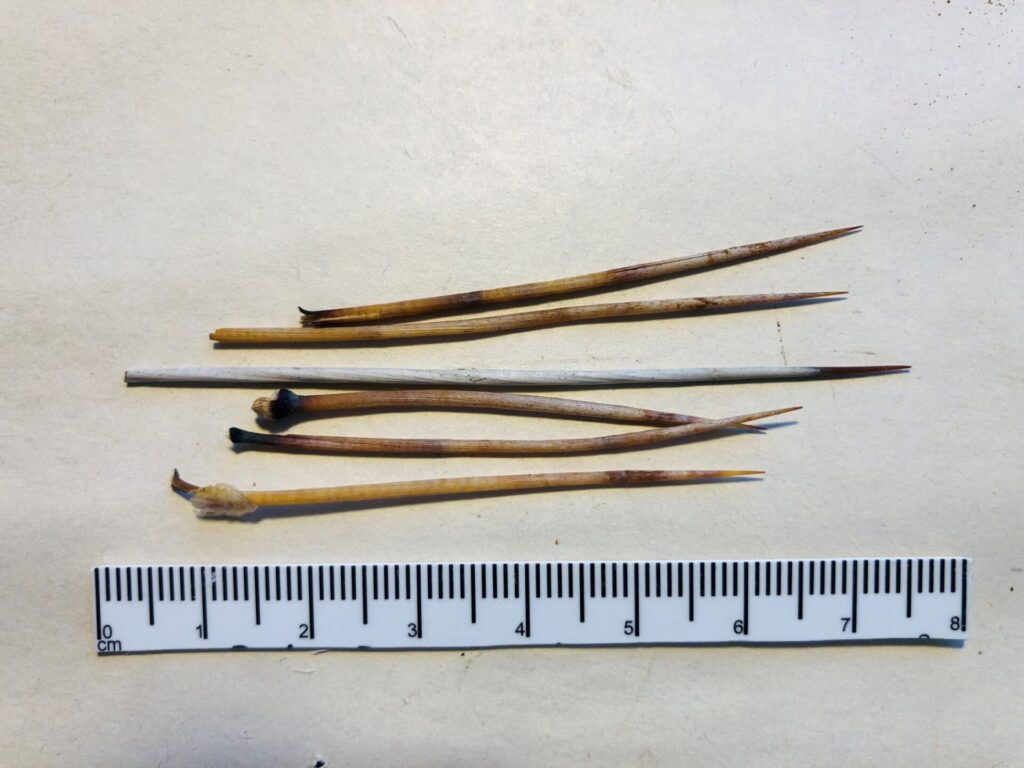
Cactus thorns really are the secret! Naturally, the femurs are thin in cross-section, so they require a means of opening them up. This is best done while the leg segments are fresh and moist. When they are too dry, the bead splits on the long axis.

Here’s a diagram I drew that shows how and why the leg segment needs to be opened up.
Beads drying on cactus spines.

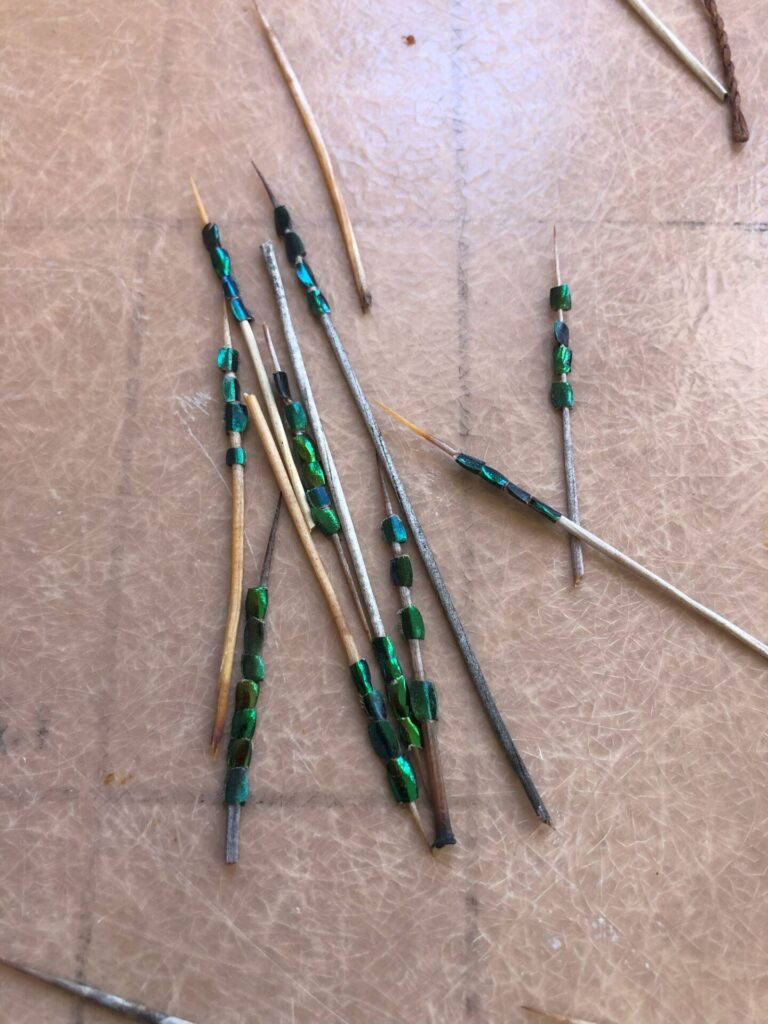
Next, I let them dry out on the thorn. When you go to pull them off, be aware that you’ll have to slowly ream them out a bit with the spine to get rid of any “leg jerky” left inside.

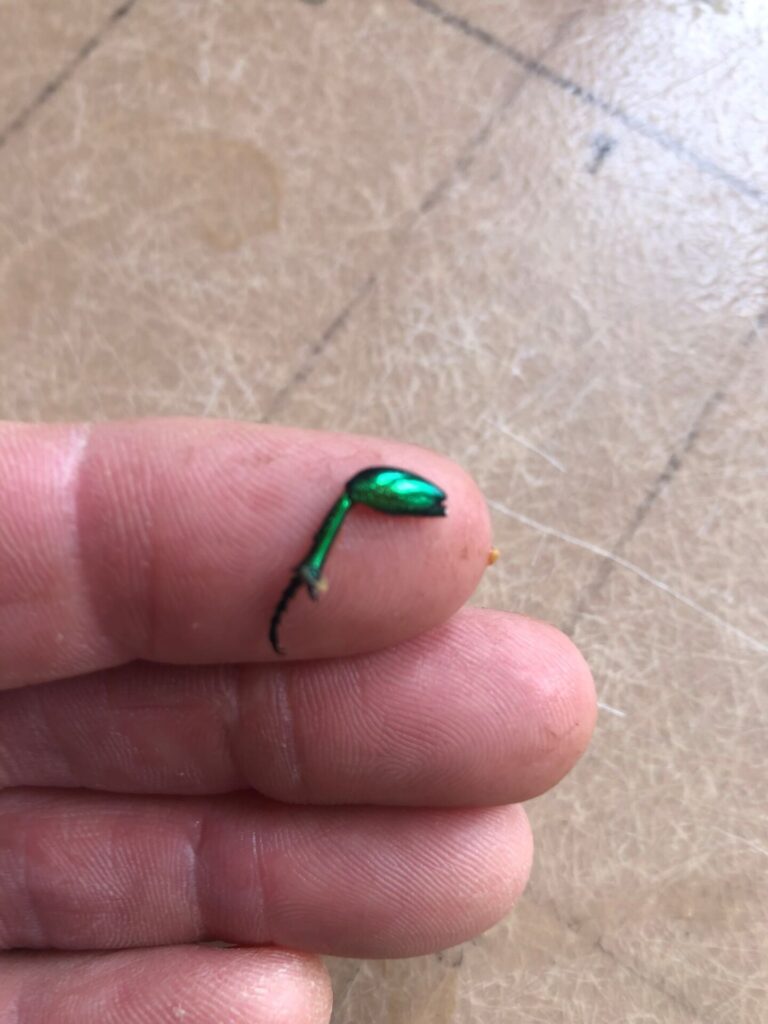
You should end up, as I did, with a bead that has a nice opening that can be strung on a fine piece of cordage.

The perforation from the cactus spine needs to be just large enough that the bead will slide onto the cordage.

I made my cordage out of dogbane, but you can use any plant fibers, so long as they spin up fairly finely.

I used a bit of glue to stiffen the end of my cordage for stringing. I’m sure there were plenty of natural glues and stiffeners people used for such work in the past.
Here I am stringing a bead. You can see that your cordage must be fine and even.

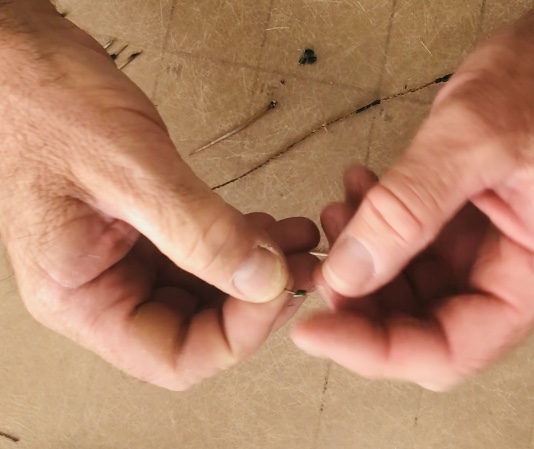
It took me 75 beetles to finish a short necklace. Analysts estimated that the ancient examples used more than 100 insects per necklace. One of the recovered examples also has a shell pendant.

Let me know how yours turn out! Send pictures! Let me know how many new friends you make when you wear yours out and about!

My new bling.
My new bling.

UPDATE: Since I submitted this post, I had an entomologist in my flintknapping class two weeks ago. He is actually studying these beetles and is saving me their legs now. I really hope I can do a Hands-On Archaeology class on how to make these, and I especially hope I can teach this to our field-school students!

3 thoughts on “Bug Bling! How to Make a Necklace out of Beetle Legs”

  1. Sharon K Miller says:
    October 2, 2023 at 9:55 am

    Great blog entry, Allen. As always!

  2. Cathy says:
    October 4, 2023 at 1:03 pm

    In the 1940s an uncle in Mesa used to take the live June bugs (yes, it is difficult to update vocabulary), tie a thread under the wings and fly them around their yard at their house at the Mesa, Arizona Experimental Farm. Afterwards, the thread would be cut away on top of the wings and the June bug would fly away.

  3. Judy Swink says:
    October 4, 2023 at 6:41 pm

    When I was a child, we would capture June Bugs and tie a piece of thread to a leg. The thread would be tied onto a safety pin (I don’t recall but surely that was the first step) then pin the June Bug to a shoulder where it would crawl around like mobile brooches or try to fly. I don’t remember, 70 years later, just when or how we released them. Sad to think how cruel that was to the insect, and likely crippled it as well.

Comments are closed.

Explore the News

  • Preservation Archaeology Blog
  • Press Releases/Announcements
  • Preservation Archaeology Today
  • Join Today

    Keep up with the latest discoveries in southwestern archaeology. Join today, and receive Archaeology Southwest Magazine, among other member benefits.

    Become A Member

Want to help us? Make a donation

or take action

Cyber SouthwestRespect Great BendHands-On ArchaeologySave History

© 2025 Archaeology Southwest

520.882.6946
Contact
  • My Store Account
  • Contact Us
  • Terms of Use
  • Privacy Policy
  • Press Room