• Donate
    • Donate
    • Member Circles and Benefits
    • Become a Member
    • Renew Today
    • Give a Gift Membership
    • Student Membership
  • Take Action
    • Volunteer Program
    • Make Your Voice Heard
  • About
    • Land Acknowledgment
    • What We Do
    • Position Papers
    • Team & People
    • Job Openings
    • Partners & Friends
    • Annual Reports
    • Policies & Financials
  • Things to Do
    • Events
    • Archaeology Café
    • Exhibits
    • Classes
    • Field School
  • Explore
    • Free Resources
    • Introduction to Southwestern Archaeology
    • Projects
    • Protection Efforts
    • Ancient Cultures
    • Videos
    • Places to Visit
  • Store
    • Archaeology Southwest Magazine
    • All Products
  • News
    • Blog
    • Press Releases/Announcements
    • Preservation Archaeology Today
    • Sign up for E-News
  • Donate
    • Donate
    • Member Circles and Benefits
    • Become a Member
    • Renew Today
    • Give a Gift Membership
    • Student Membership
  • Take Action
    • Volunteer Program
    • Make Your Voice Heard
X
  • About
    • Land Acknowledgment
    • What We Do
    • Position Papers
    • Team & People
    • Job Openings
    • Partners & Friends
    • Annual Reports
    • Policies & Financials
  • Things to Do
    • Events
    • Archaeology Café
    • Speakers Bureau
    • Exhibits
    • Classes
    • Field School
  • Explore
    • Free Resources
    • SW Archaeology 101
    • Projects
    • Protection Efforts
    • Ancient Cultures
    • Videos
    • Places to Visit
  • Store
    • Archaeology Southwest Magazine
    • All Products
  • News
    • Blog
    • Press Releases/Announcements
    • Preservation Archaeology Today
    • Sign up for E-News

Burning Down the (Pit) House, part 1

Preservation Archaeology Blog
  • Home
  • >
  • Preservation Archaeology Blog
  • >
  • Burning Down the (Pit) House, part 1
Allen Denoyer, Preservation Archaeologist and Ancient Technologies Expert
Allen Denoyer - blog

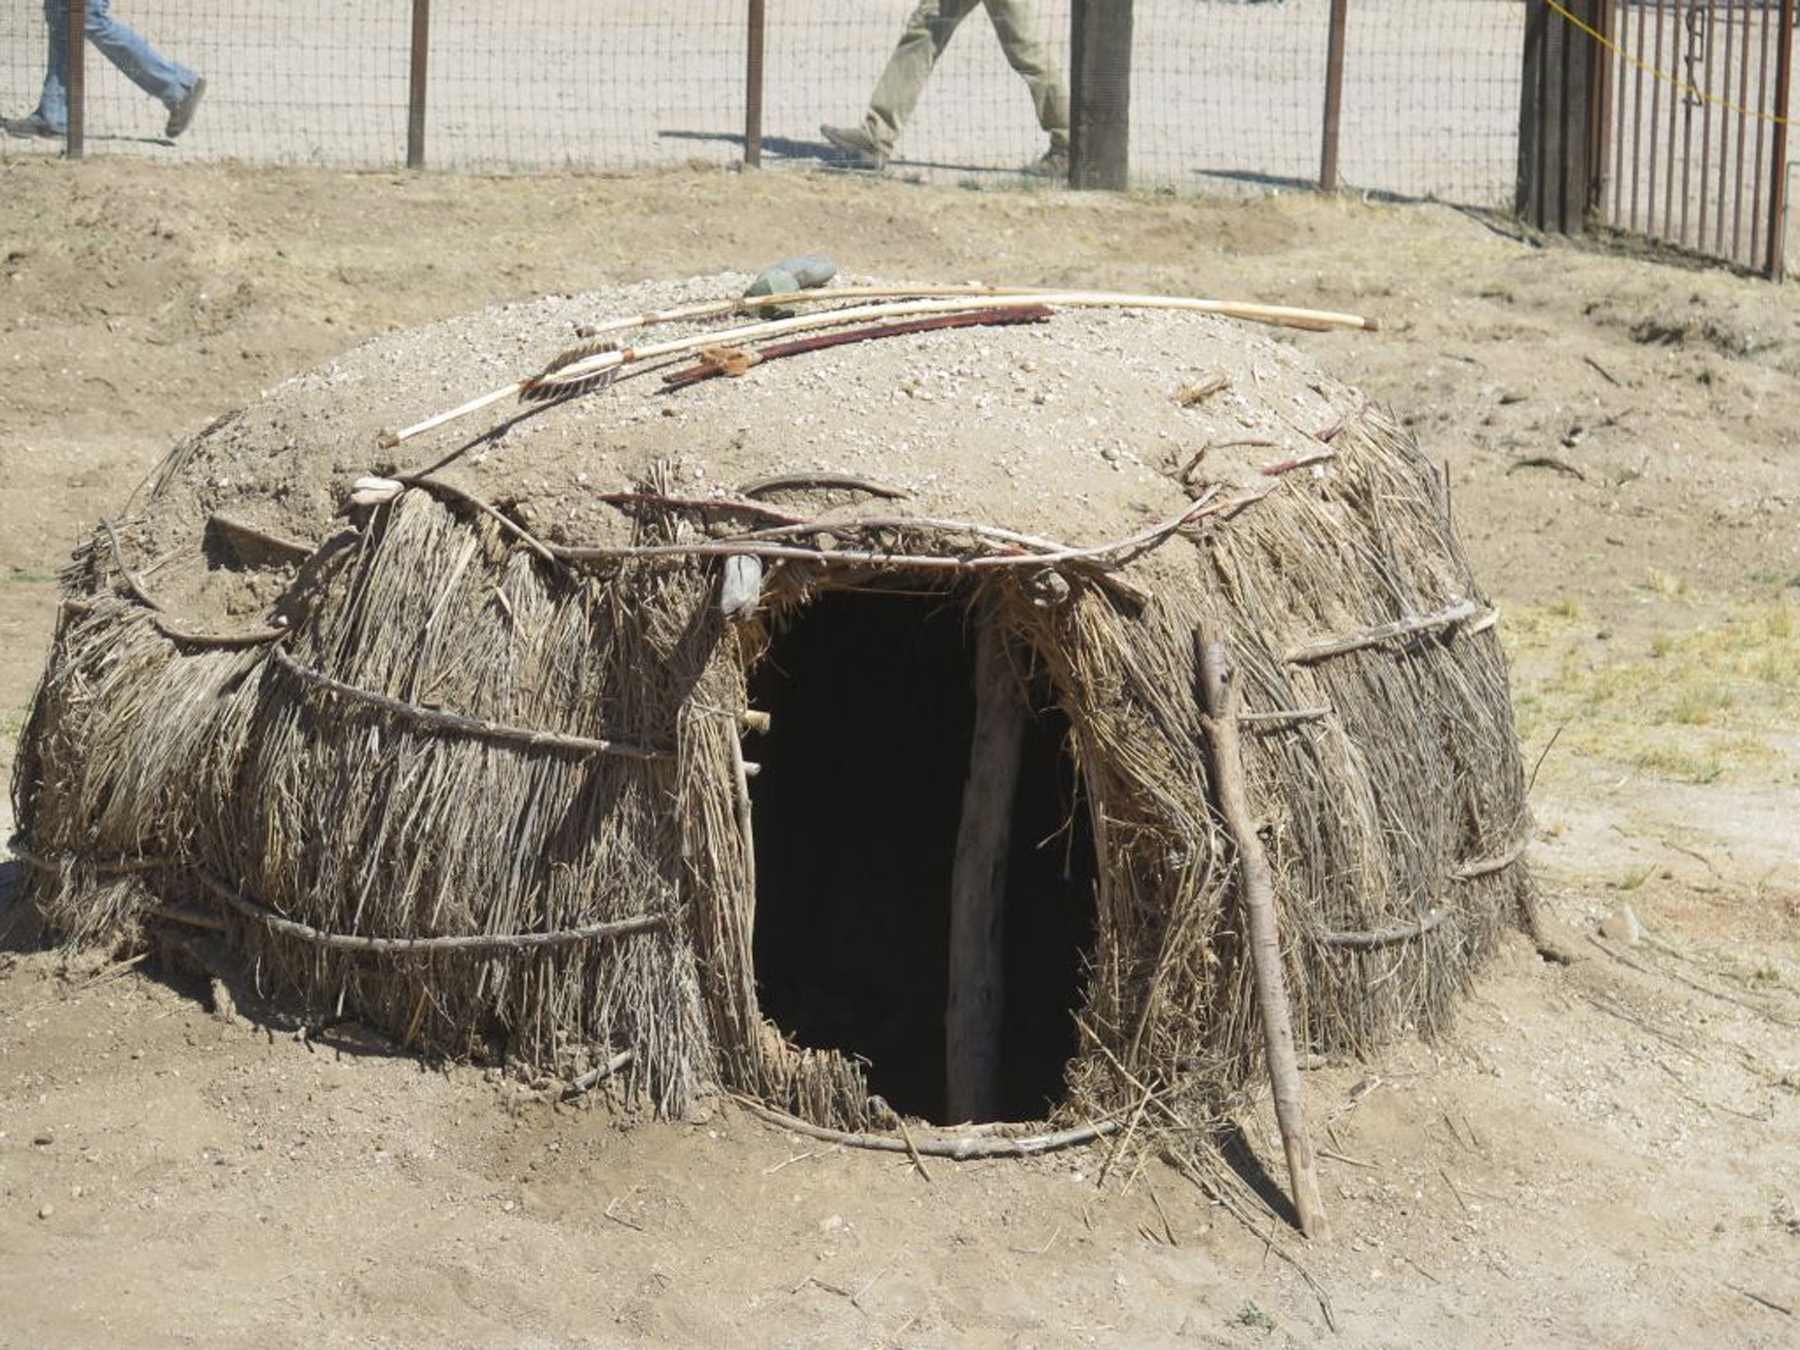
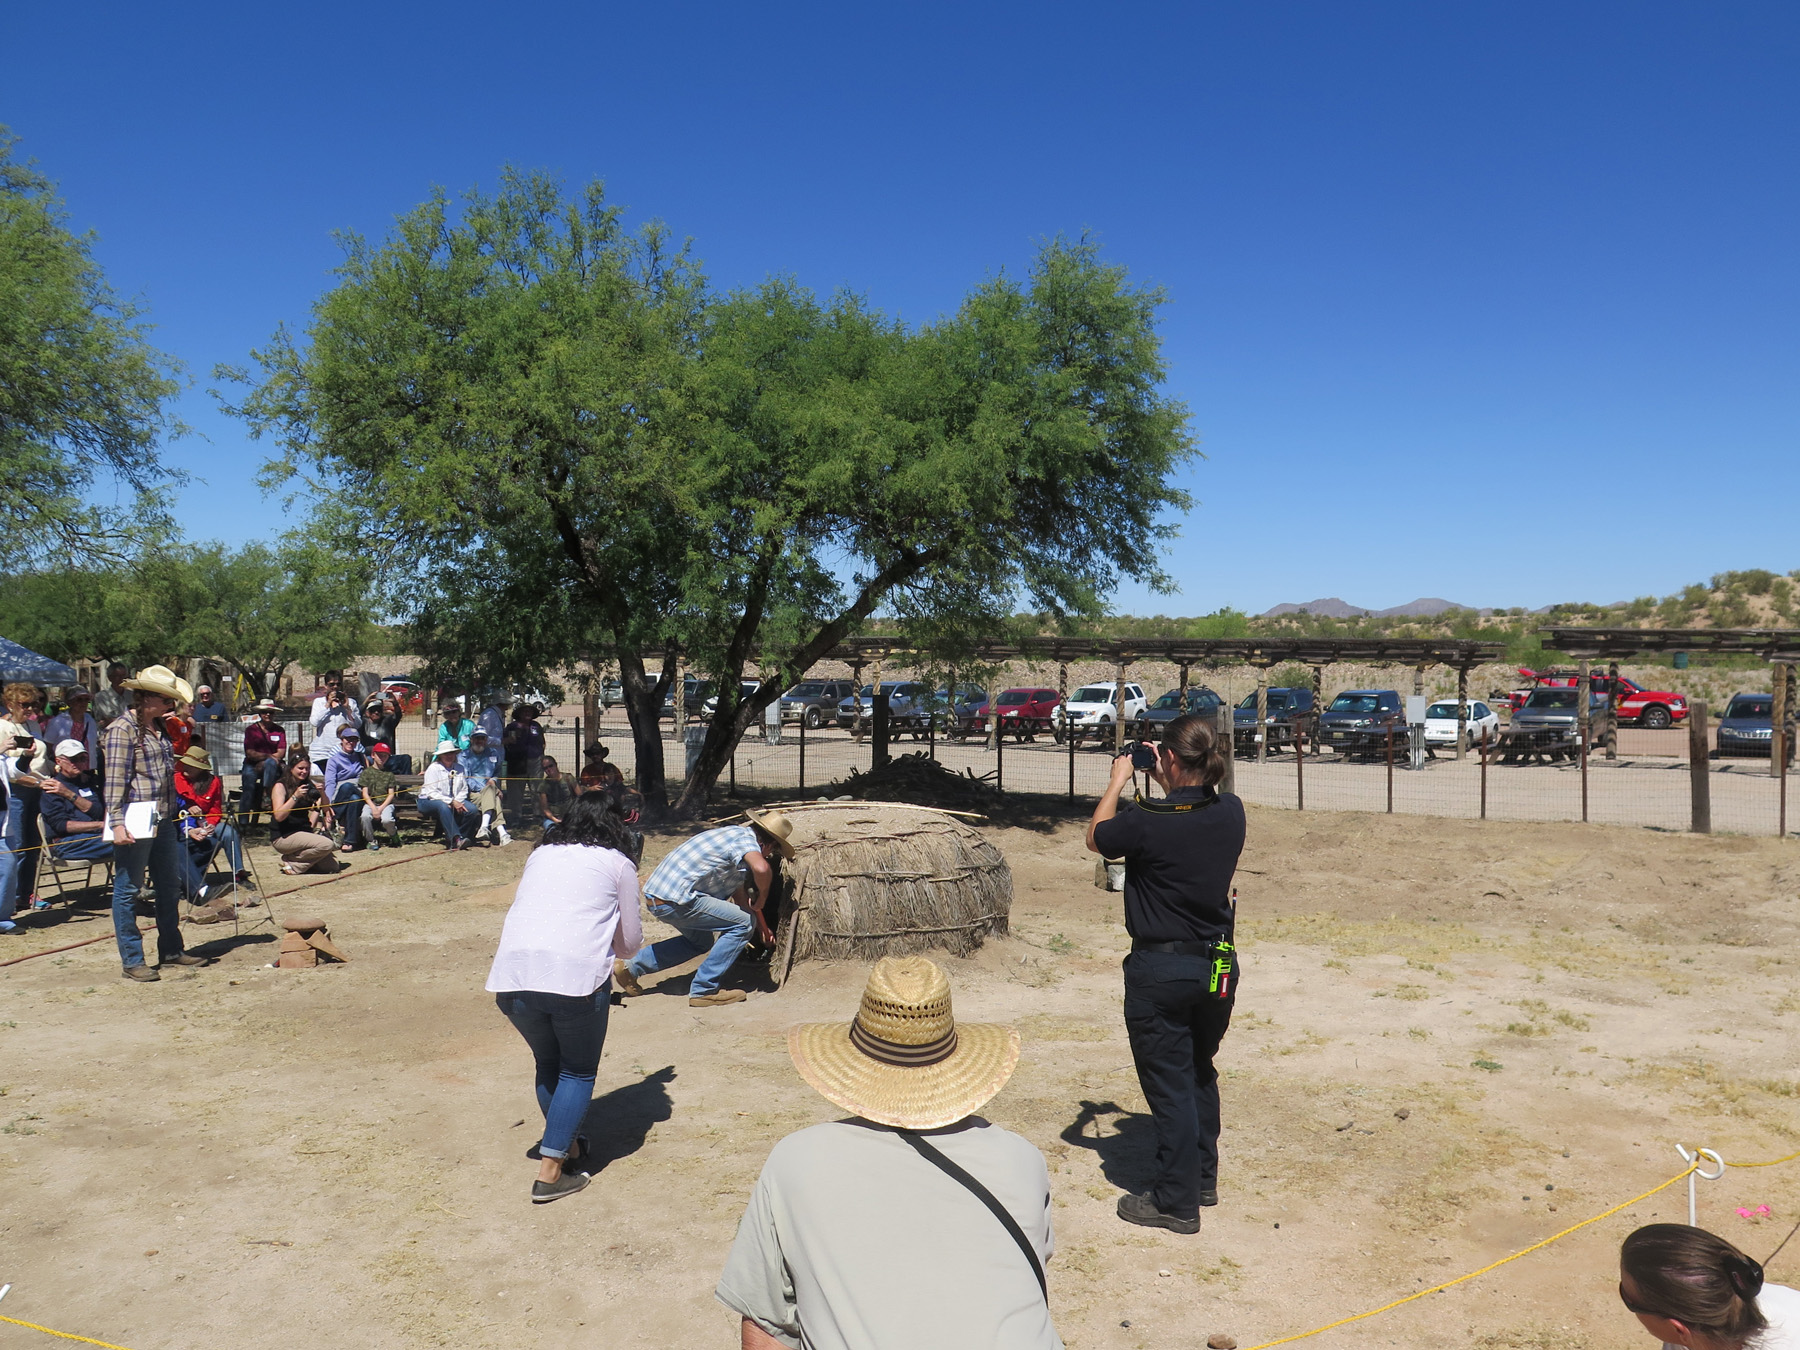
(May 19, 2017)—In 2015, volunteers joined me in building a half-scale model of a typical dwelling from the Early Agricultural period (2000 B.C.–A.D. 50) in the Tucson Basin. We built the model near our full-scale replica Hohokam pithouse at Steam Pump Ranch in Oro Valley, a public preserve where we do Hands-On experiential archaeology outreach as part of the ranch’s “Second Saturdays” events.

The first farming groups in this region sheltered in such dwellings, and we have numerous excavated examples from ancient irrigation communities along the Santa Cruz River. We based our little pithouse on one excavated in the 1990s at a site known as Los Pozos. The remains of that house dated to what archaeologists call the Cienega phase (800 B.C. to A.D. 50). At this time, people had not yet begun making and using pottery.

Los Pozos
Los Pozos

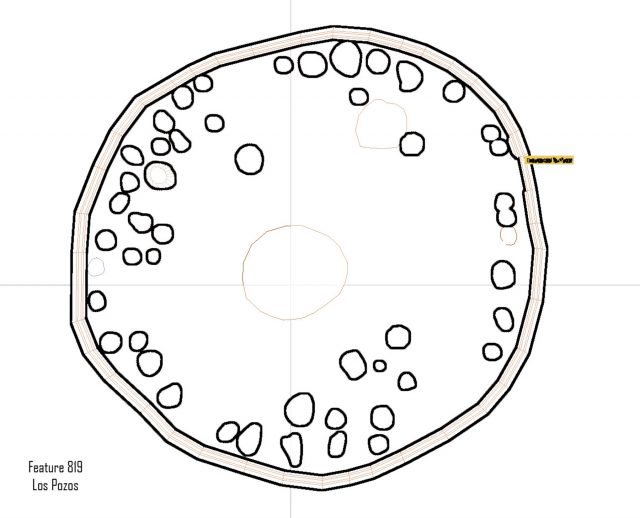
Some excavated houses at Los Pozos and generally contemporaneous sites had burned, and archaeologists found preserved sections of thatched walls. In some cases, archaeologists were able to discern construction details and even determine what species of trees and plants people used as building materials. Our model was based on what we observed and inferred from those excavated examples.

Volunteer Jaye Smith digs out the pithouse foundation.
Finished pithouse
Finished pithouse

We wondered how easy it was for such pithouses to burn. Was burning more likely deliberate or accidental? What happened as the structure burned, and how did that culminate in the patterns archaeologists find?

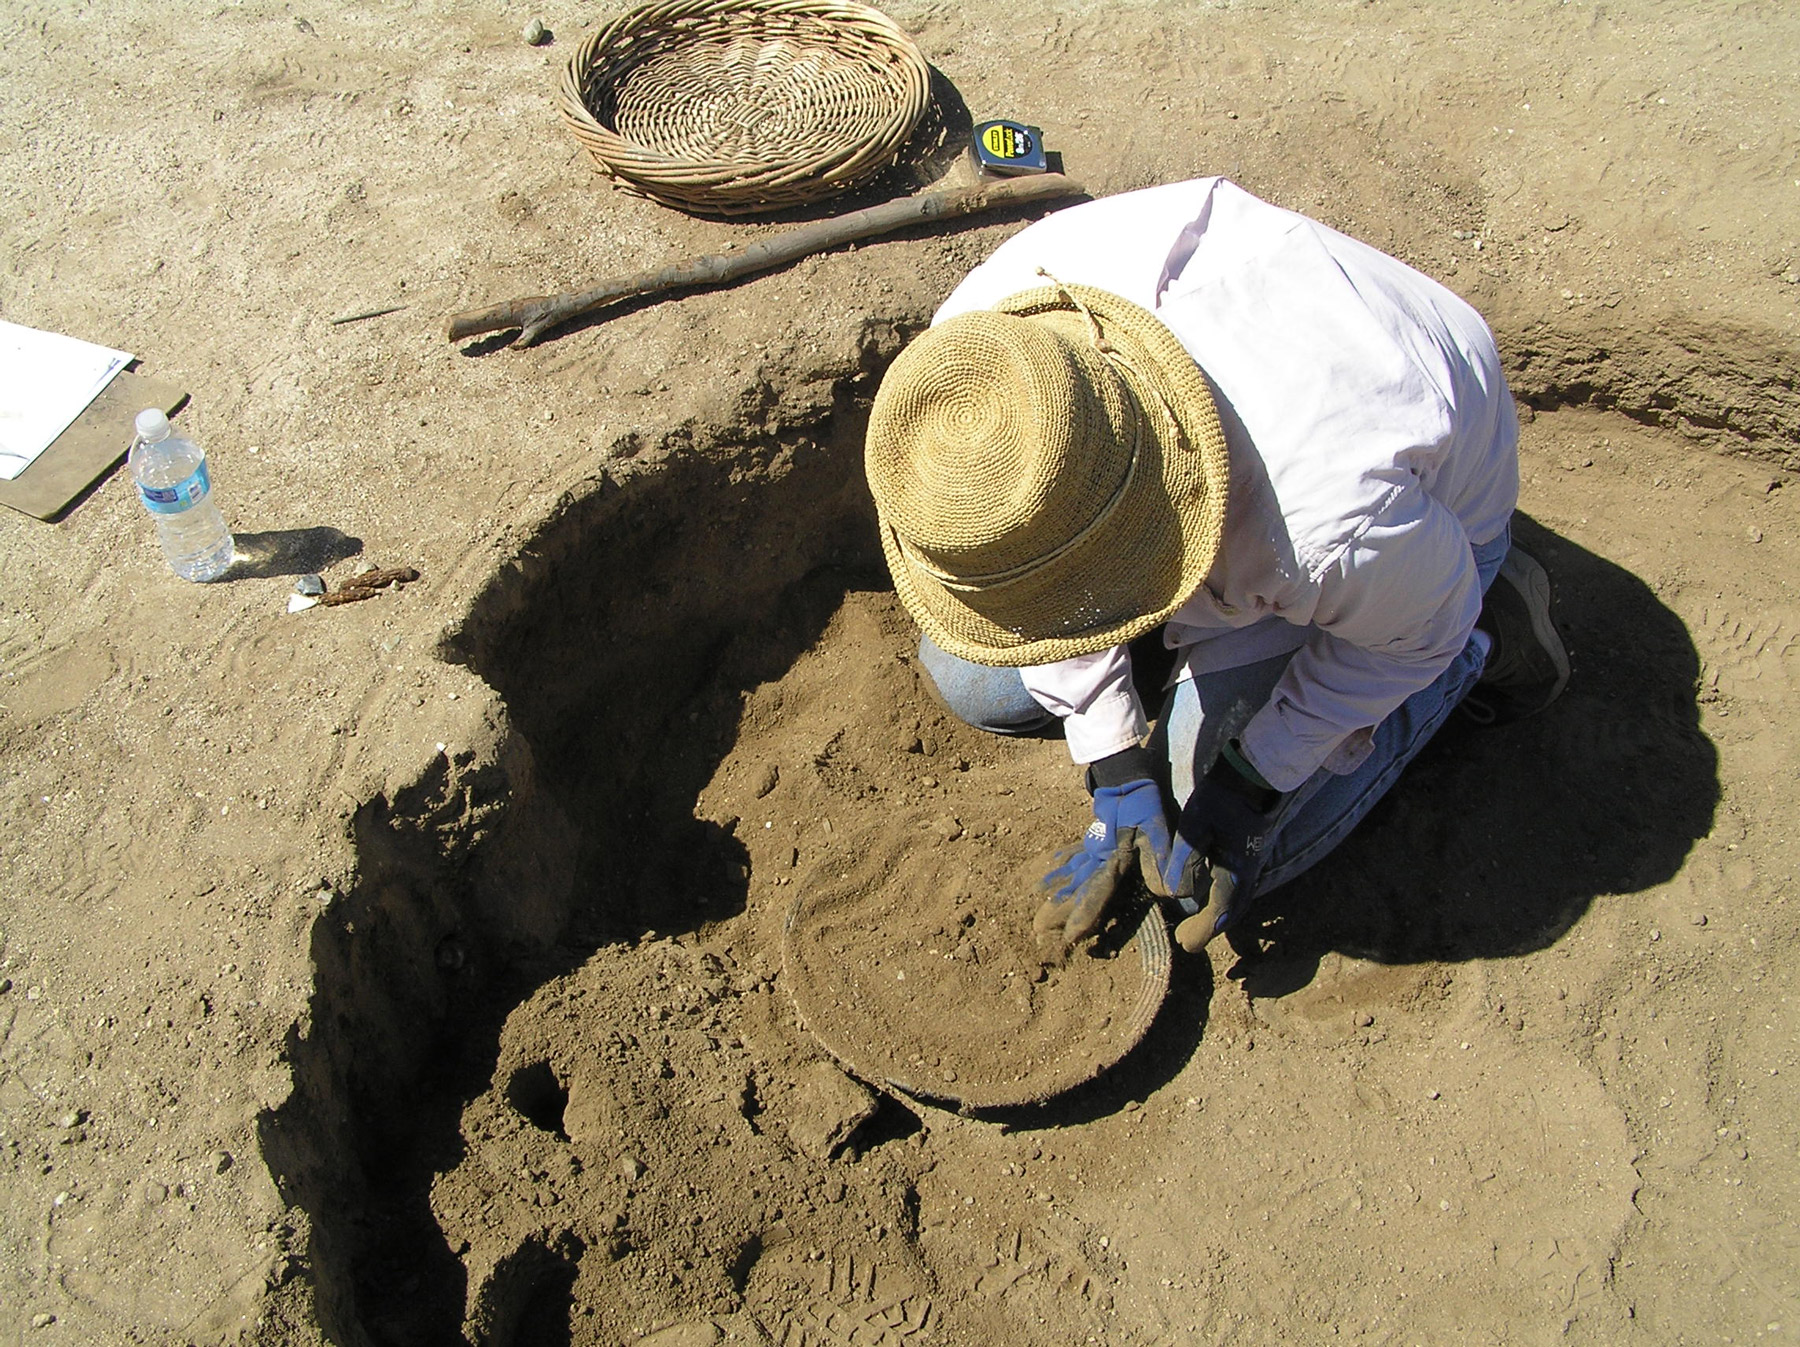
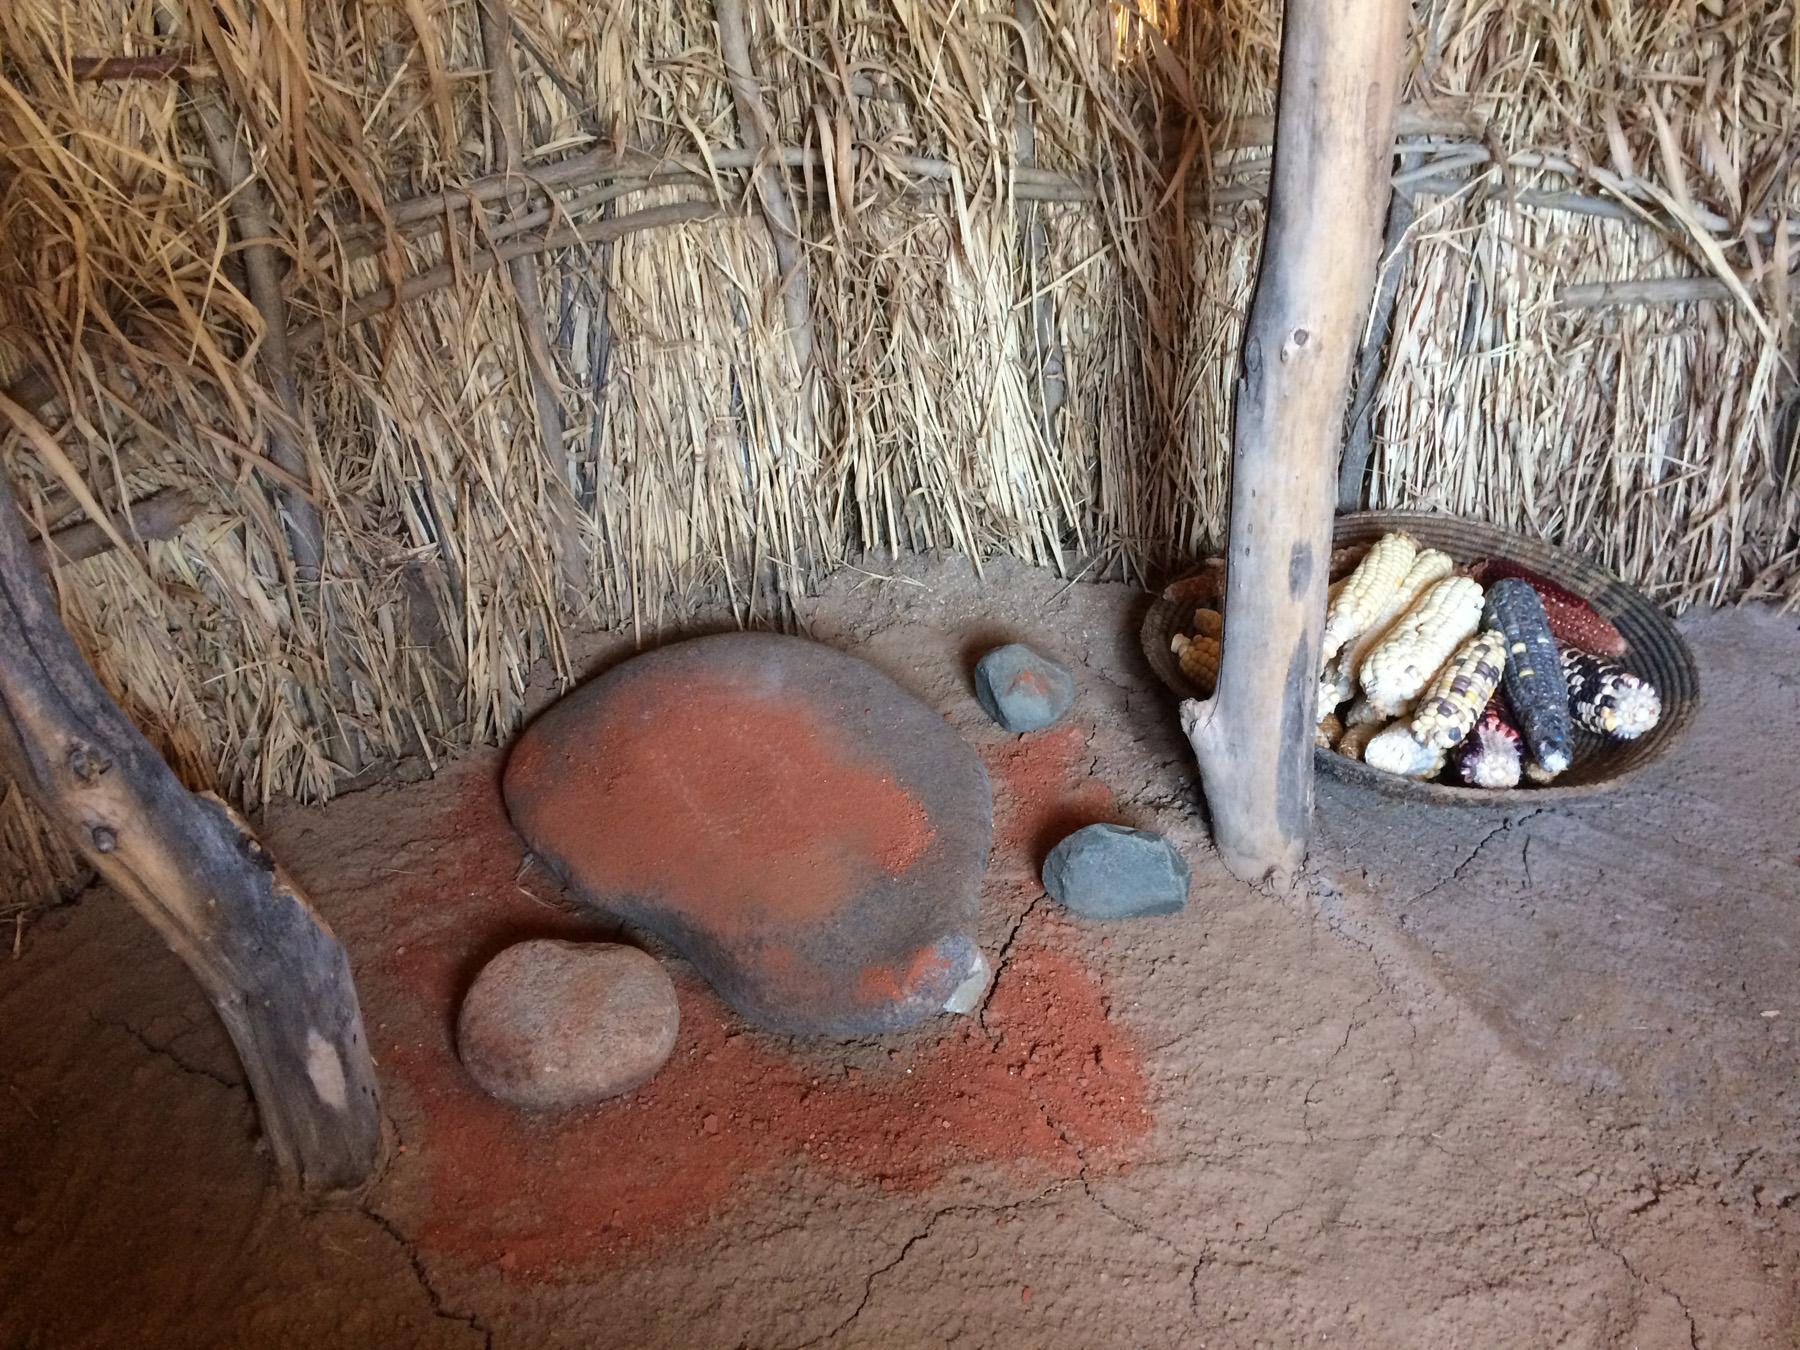
In preparation for the burn, I placed objects and replica artifacts on the floor of the house. These items are representative of what archaeologists find on house floors and in sites of the same time period.

Floor assemblage
Floor assemblage
I made a map of the house interior and the artifact locations. This will help us in a few years when we excavate the house.

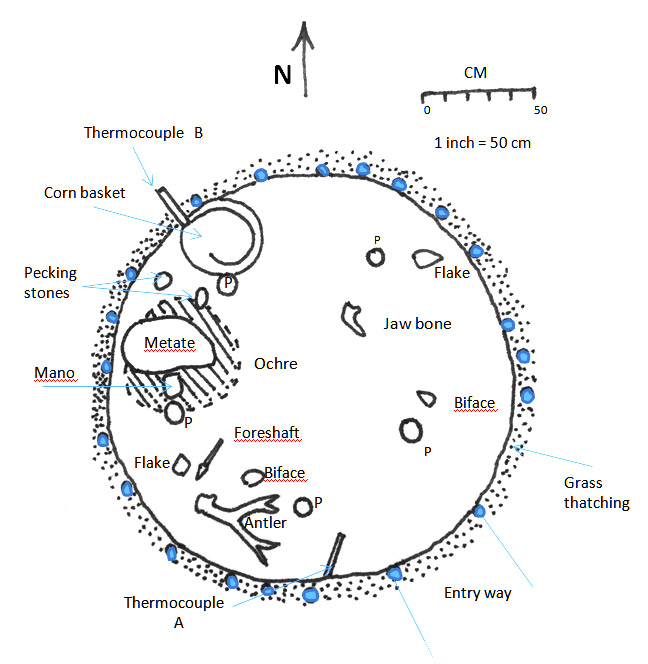
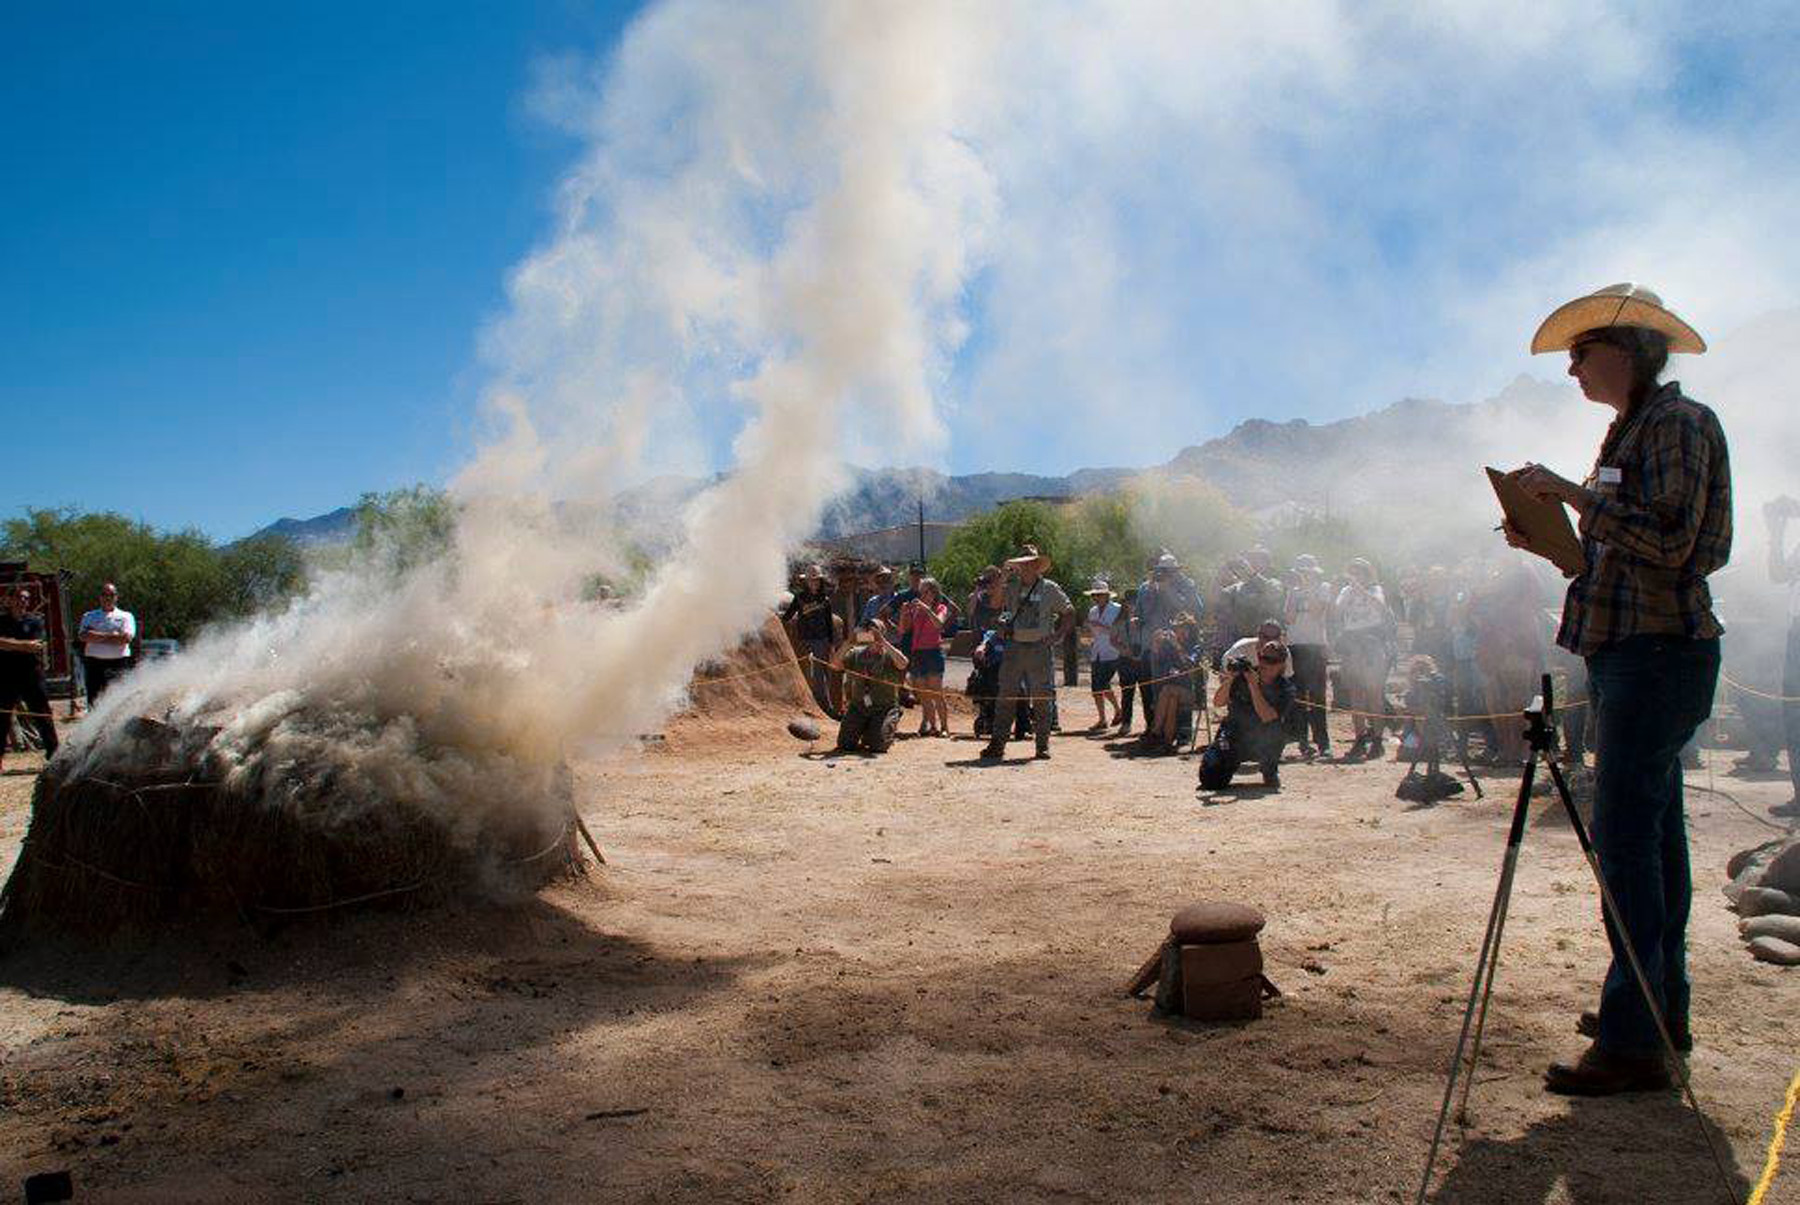
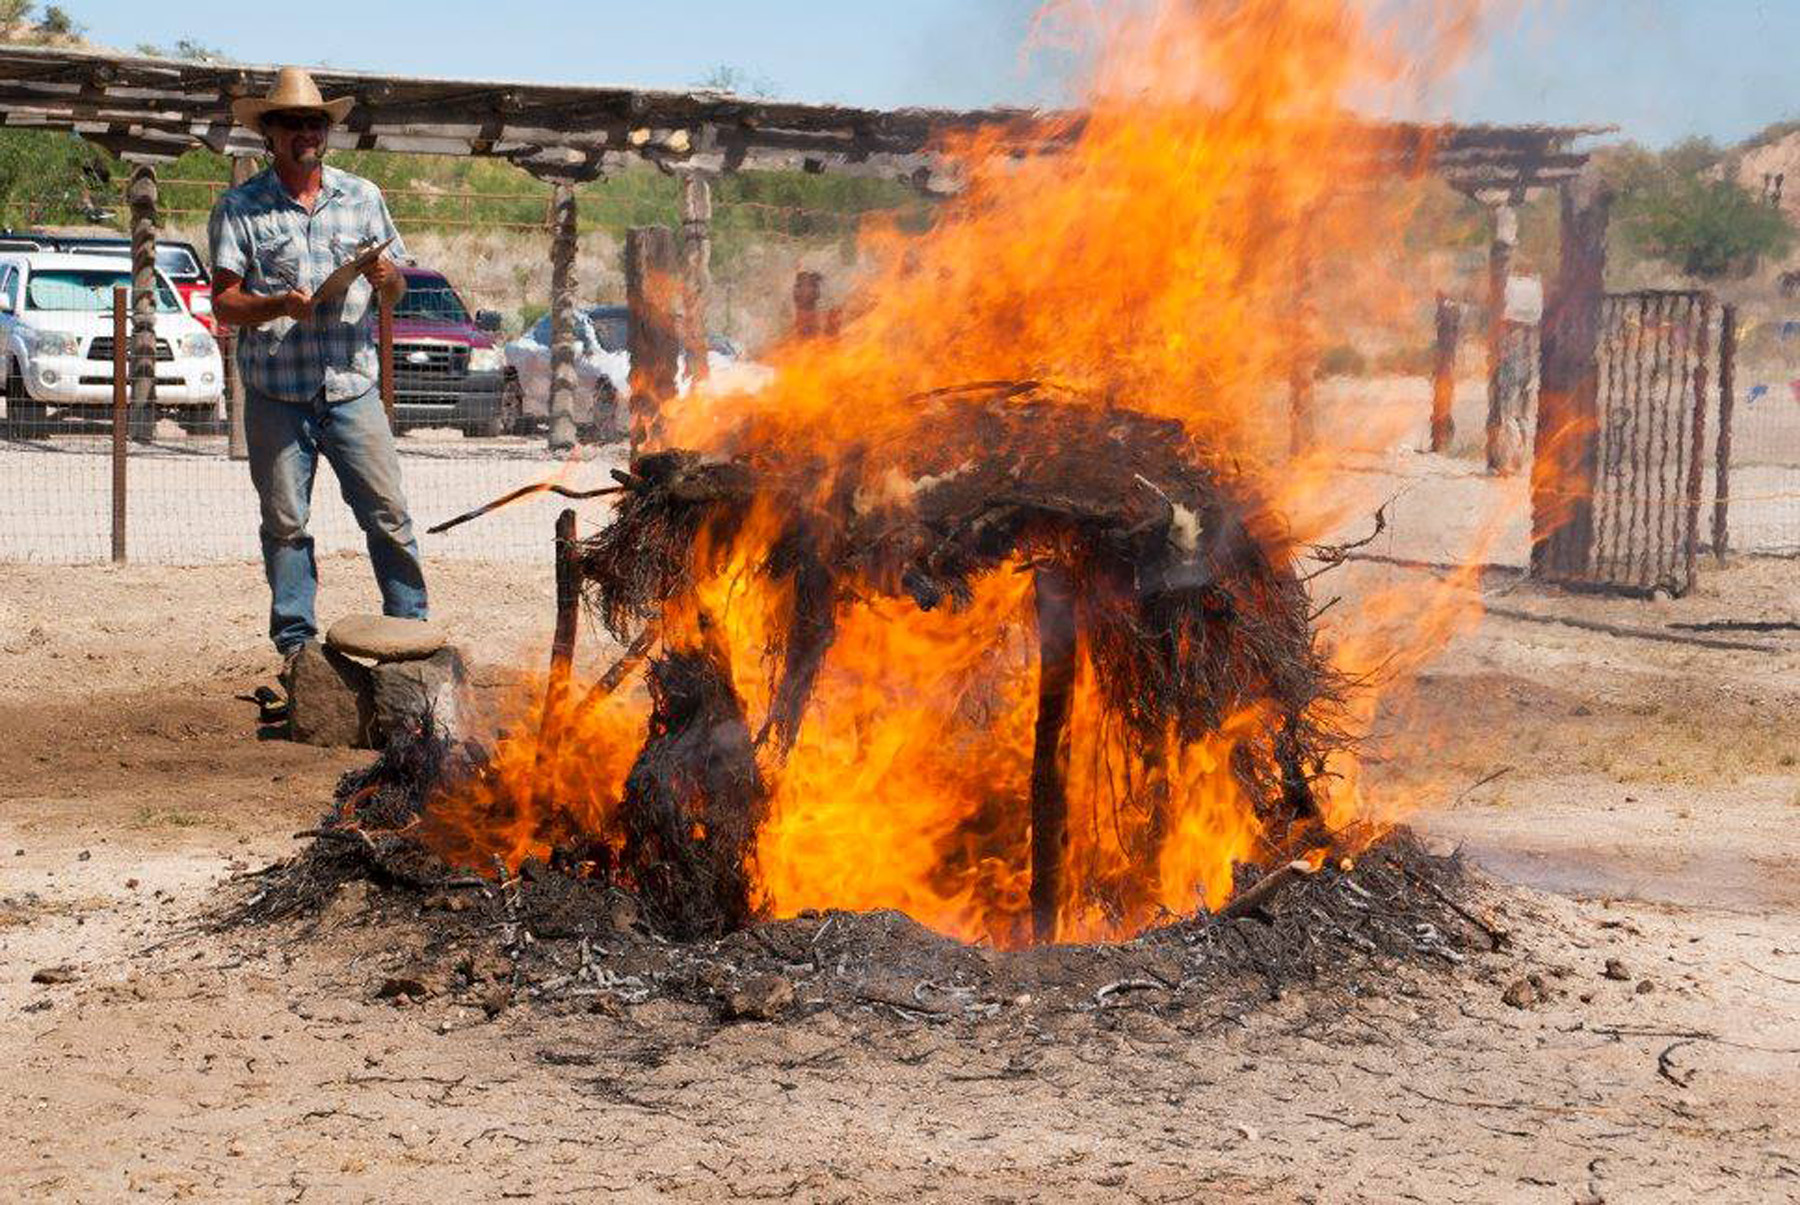
We decided to simulate an accidental fire. In some excavated pithouses, archaeologists documented oxidized patches on the floors with a thick layer of white ash covering them. Those patches abut the floor posthole pattern, suggesting that fires occurred just inside the thatched walls. What if some hot coals got too close to the thatched walls?

Shoveling the coals
Shoveling the coals

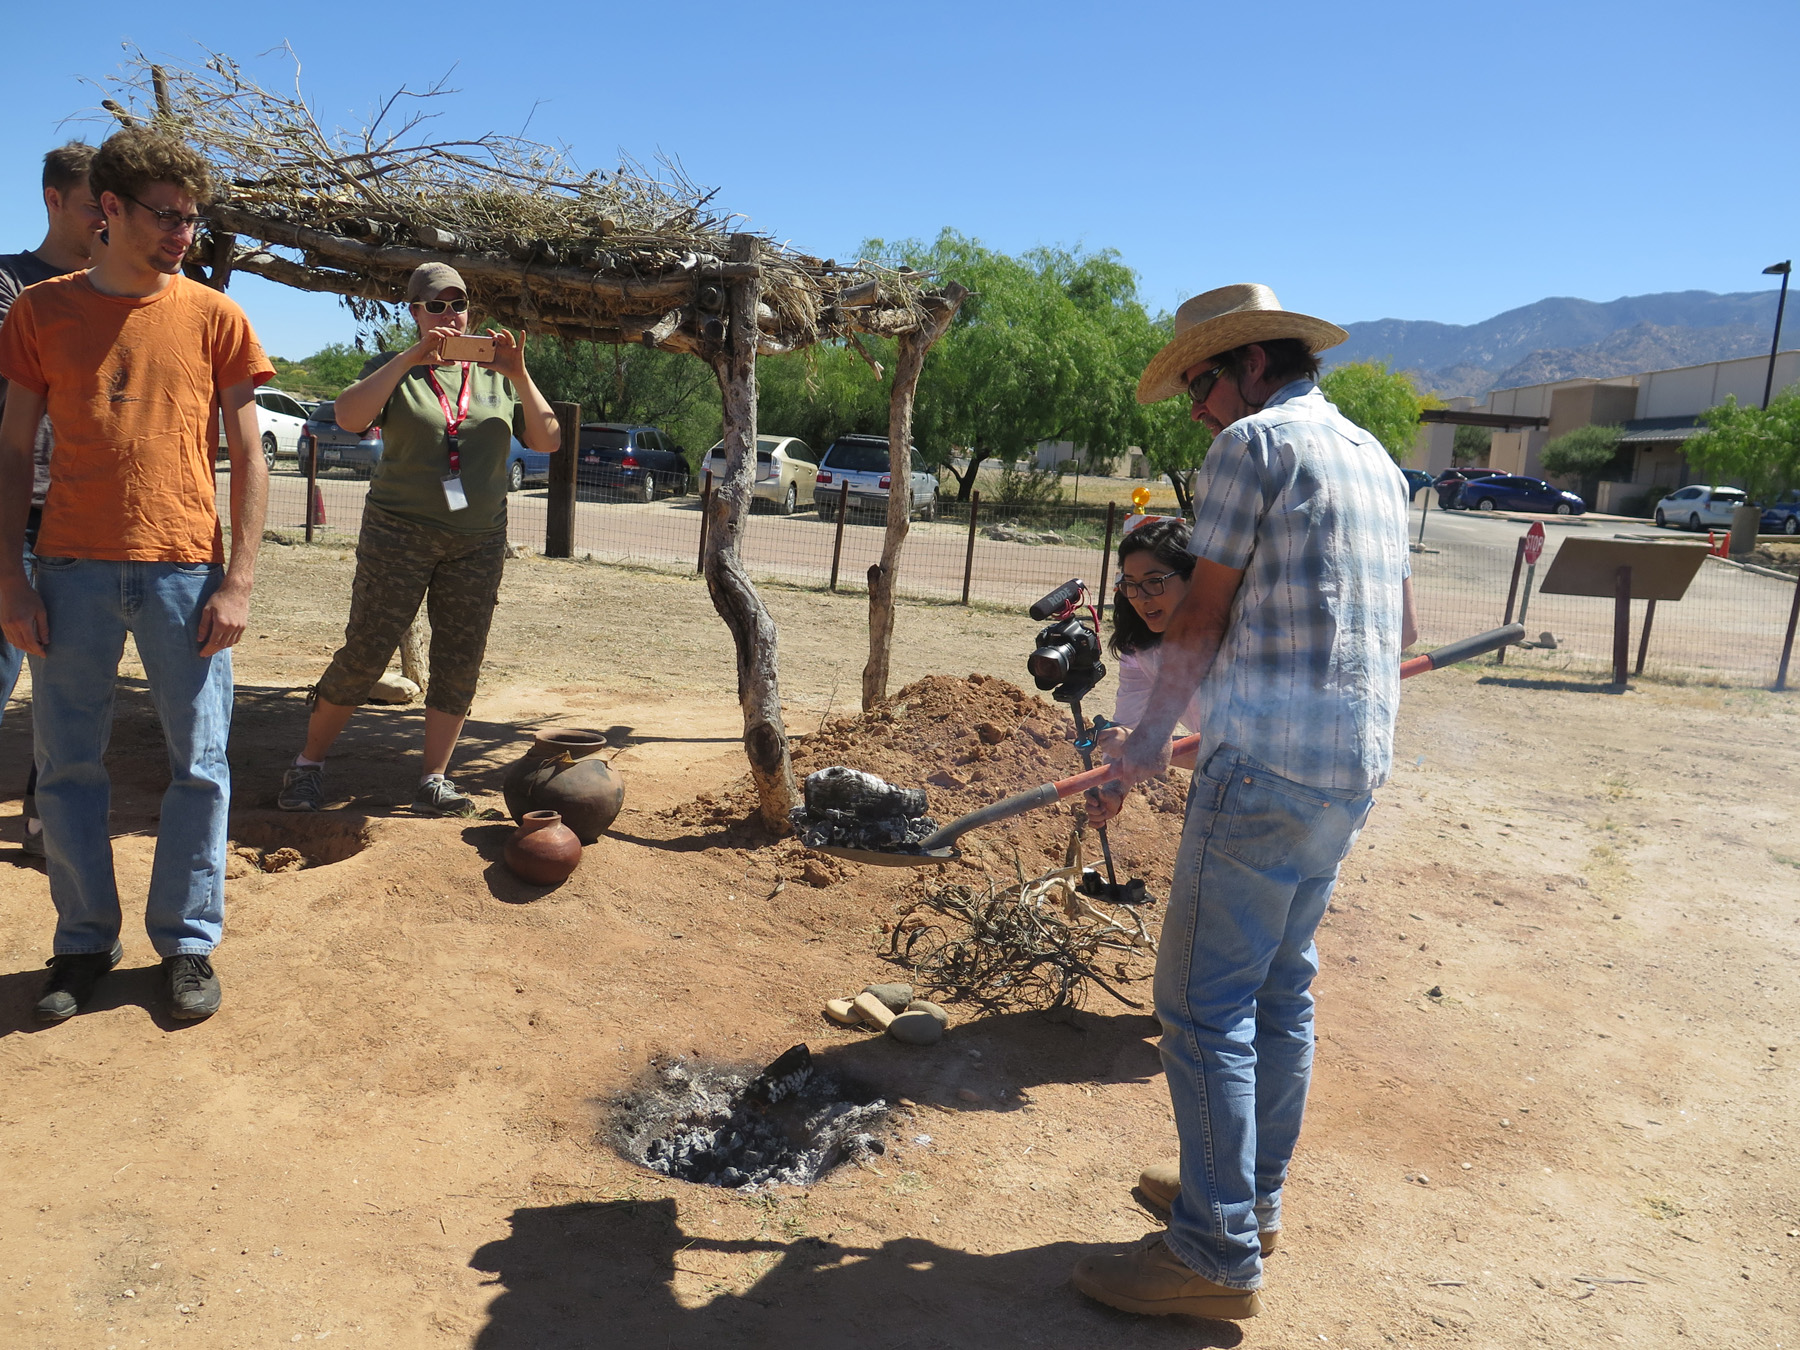
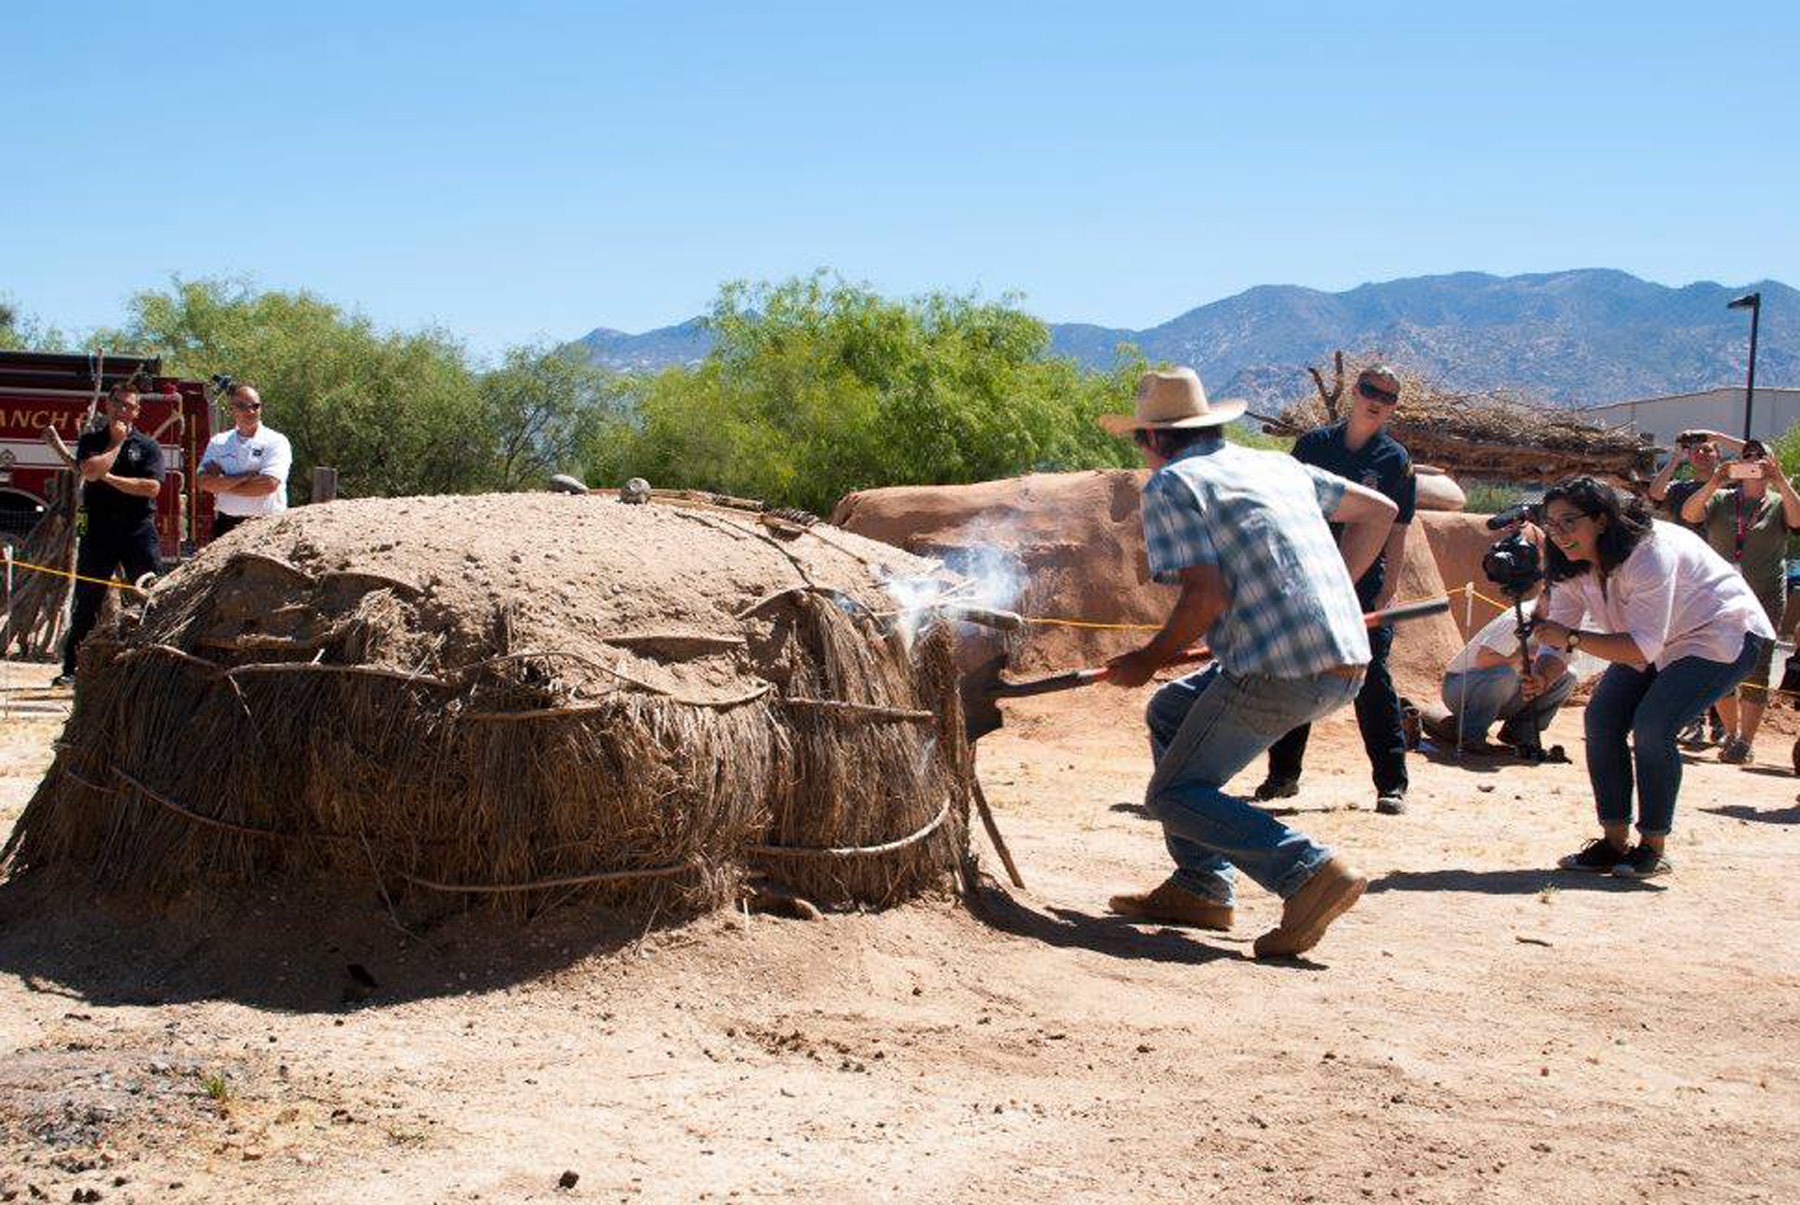
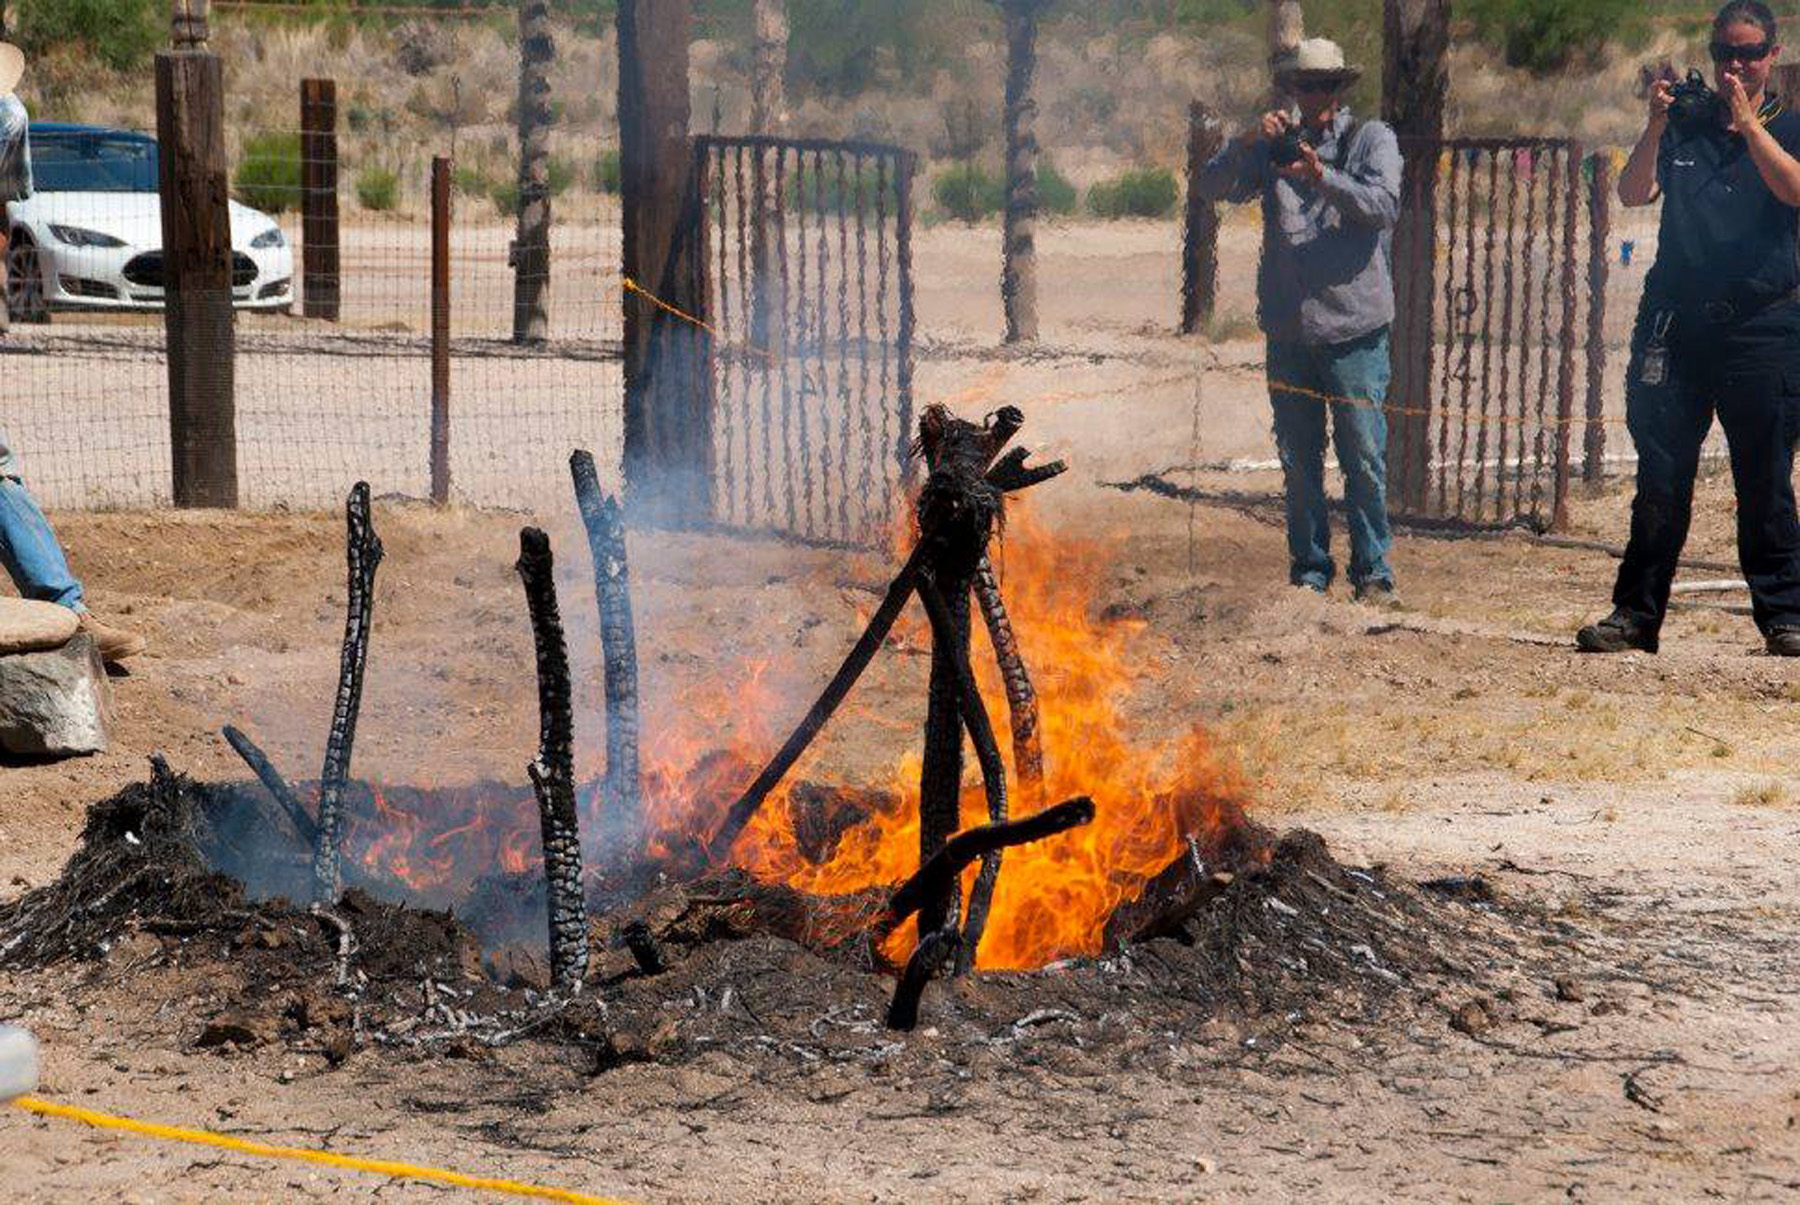
I built a fire in a nearby outdoor hearth the morning of the pithouse burn. When we were ready to begin the burn, just after 10:00 a.m., I took a shovelful of hot coals and put them just inside the house near the thatched walls…

Placing the hot coals

And it immediately began to smoke. Within seconds, the grasses burst into flames. The smoke billowed to the southwest as the fire spread across the interior.

Smoke!
Smoke!
And even more smoke!

Between 4 and 5 minutes, the fire measured about 900 degrees at the thermocouple at the basket of corn. It measured about 780 degrees near the entryway where I had placed the coals.

Fire intensity after about 2 minutes.
Fire intensity after about 4 minutes.

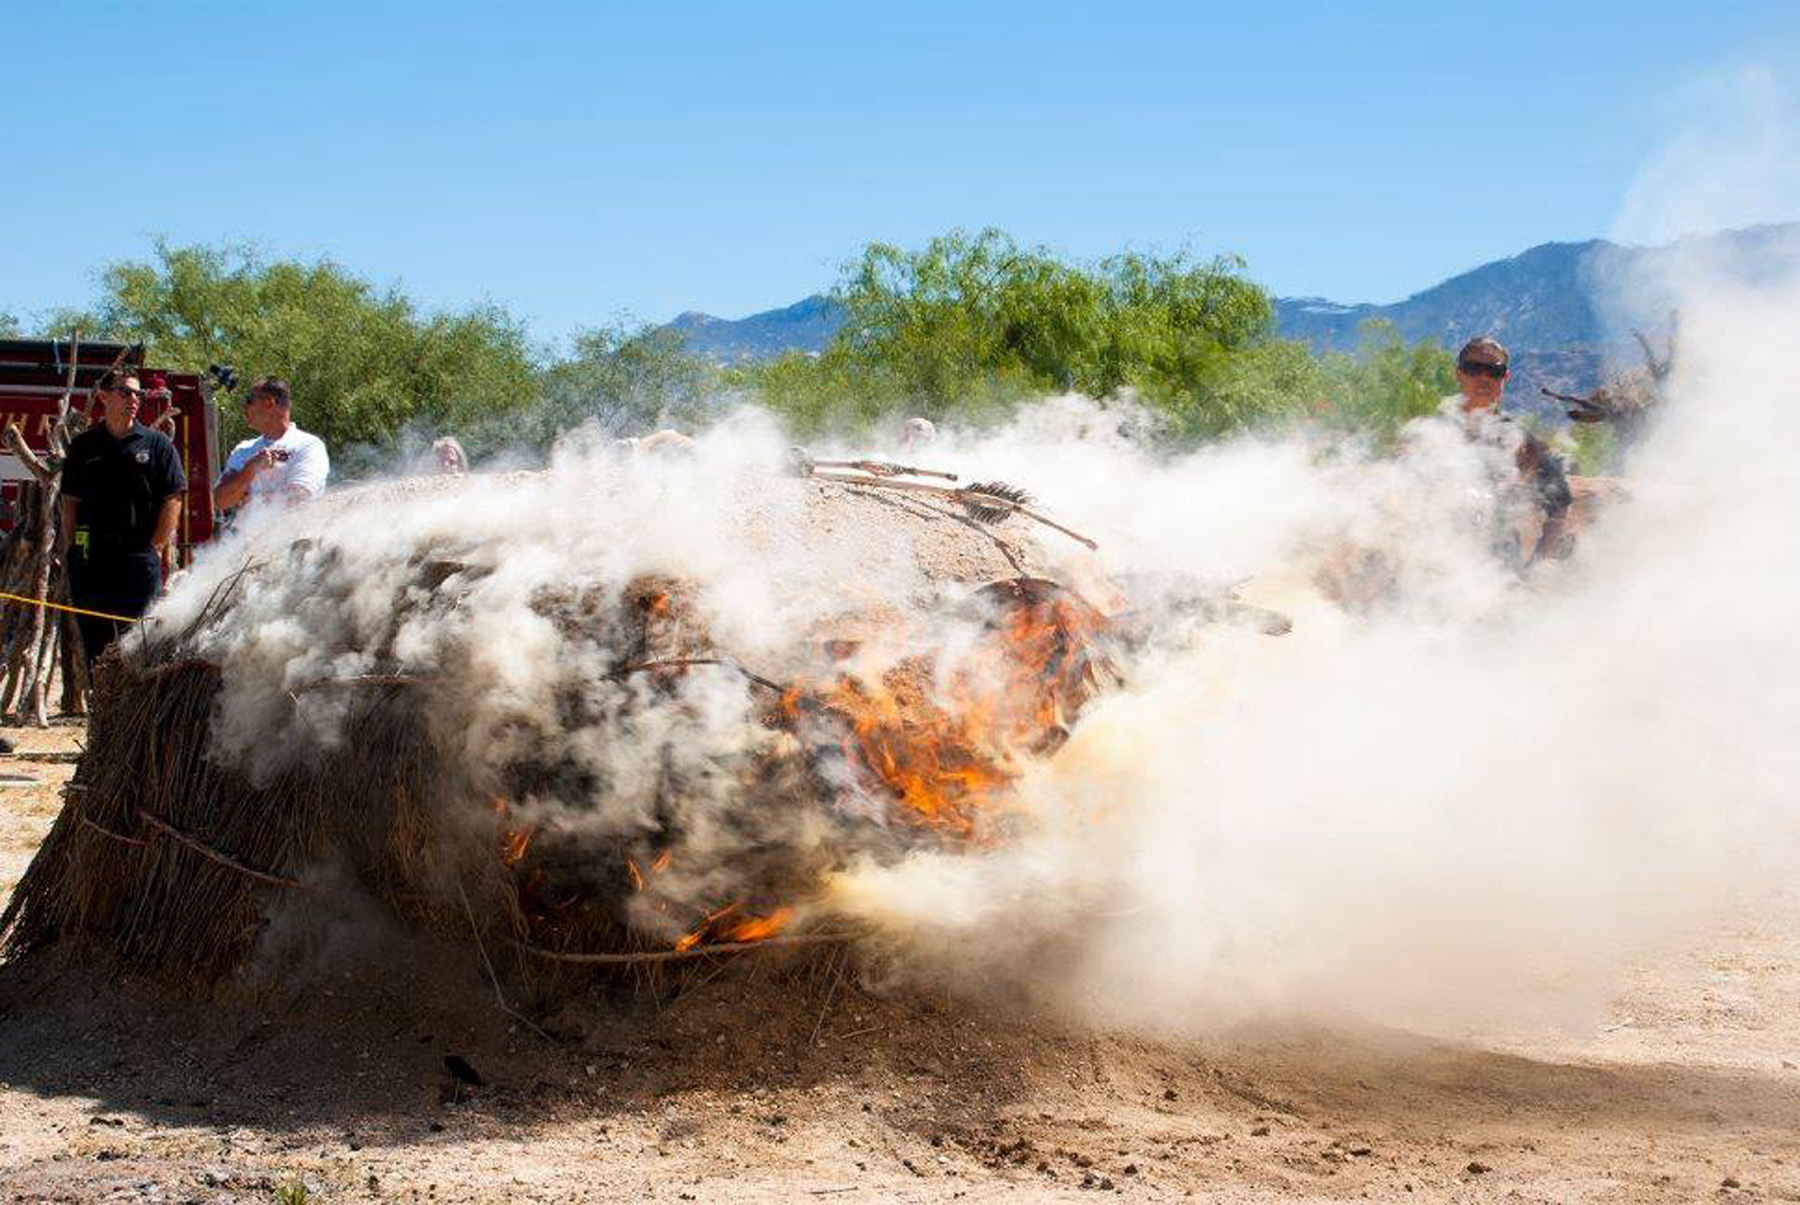
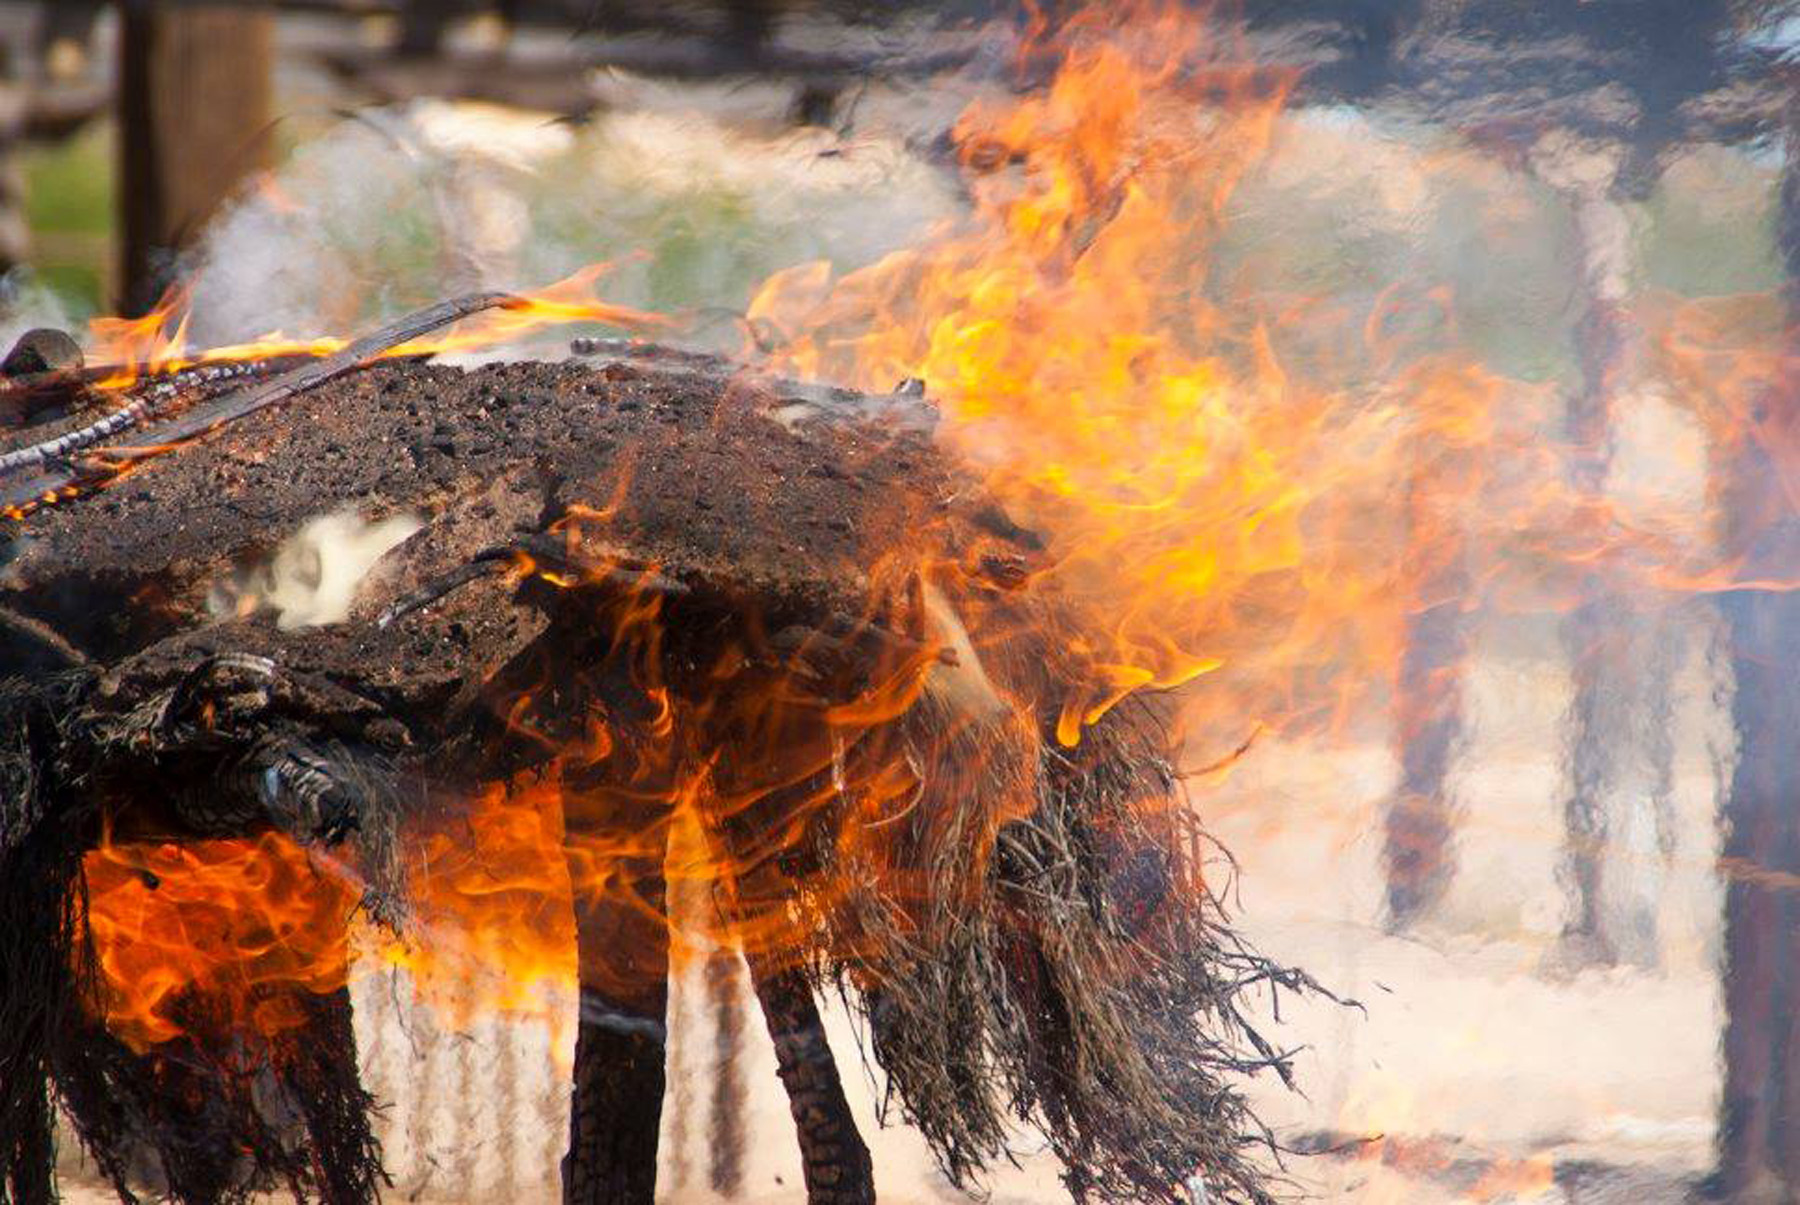
At the 6-minute mark, the fire was at its most intense. It had taken almost all of the grass thatching, and was burning up under the roof. A piece of roof collapsed into the corn basket, and the temperature at that spot began dropping. Then the edges of the roof began falling into the fire.

This is a view toward the entryway at the 5–6 minute interval.

At this point, the fire has devoured the grass thatching.

Here, the roof is close to collapsing.

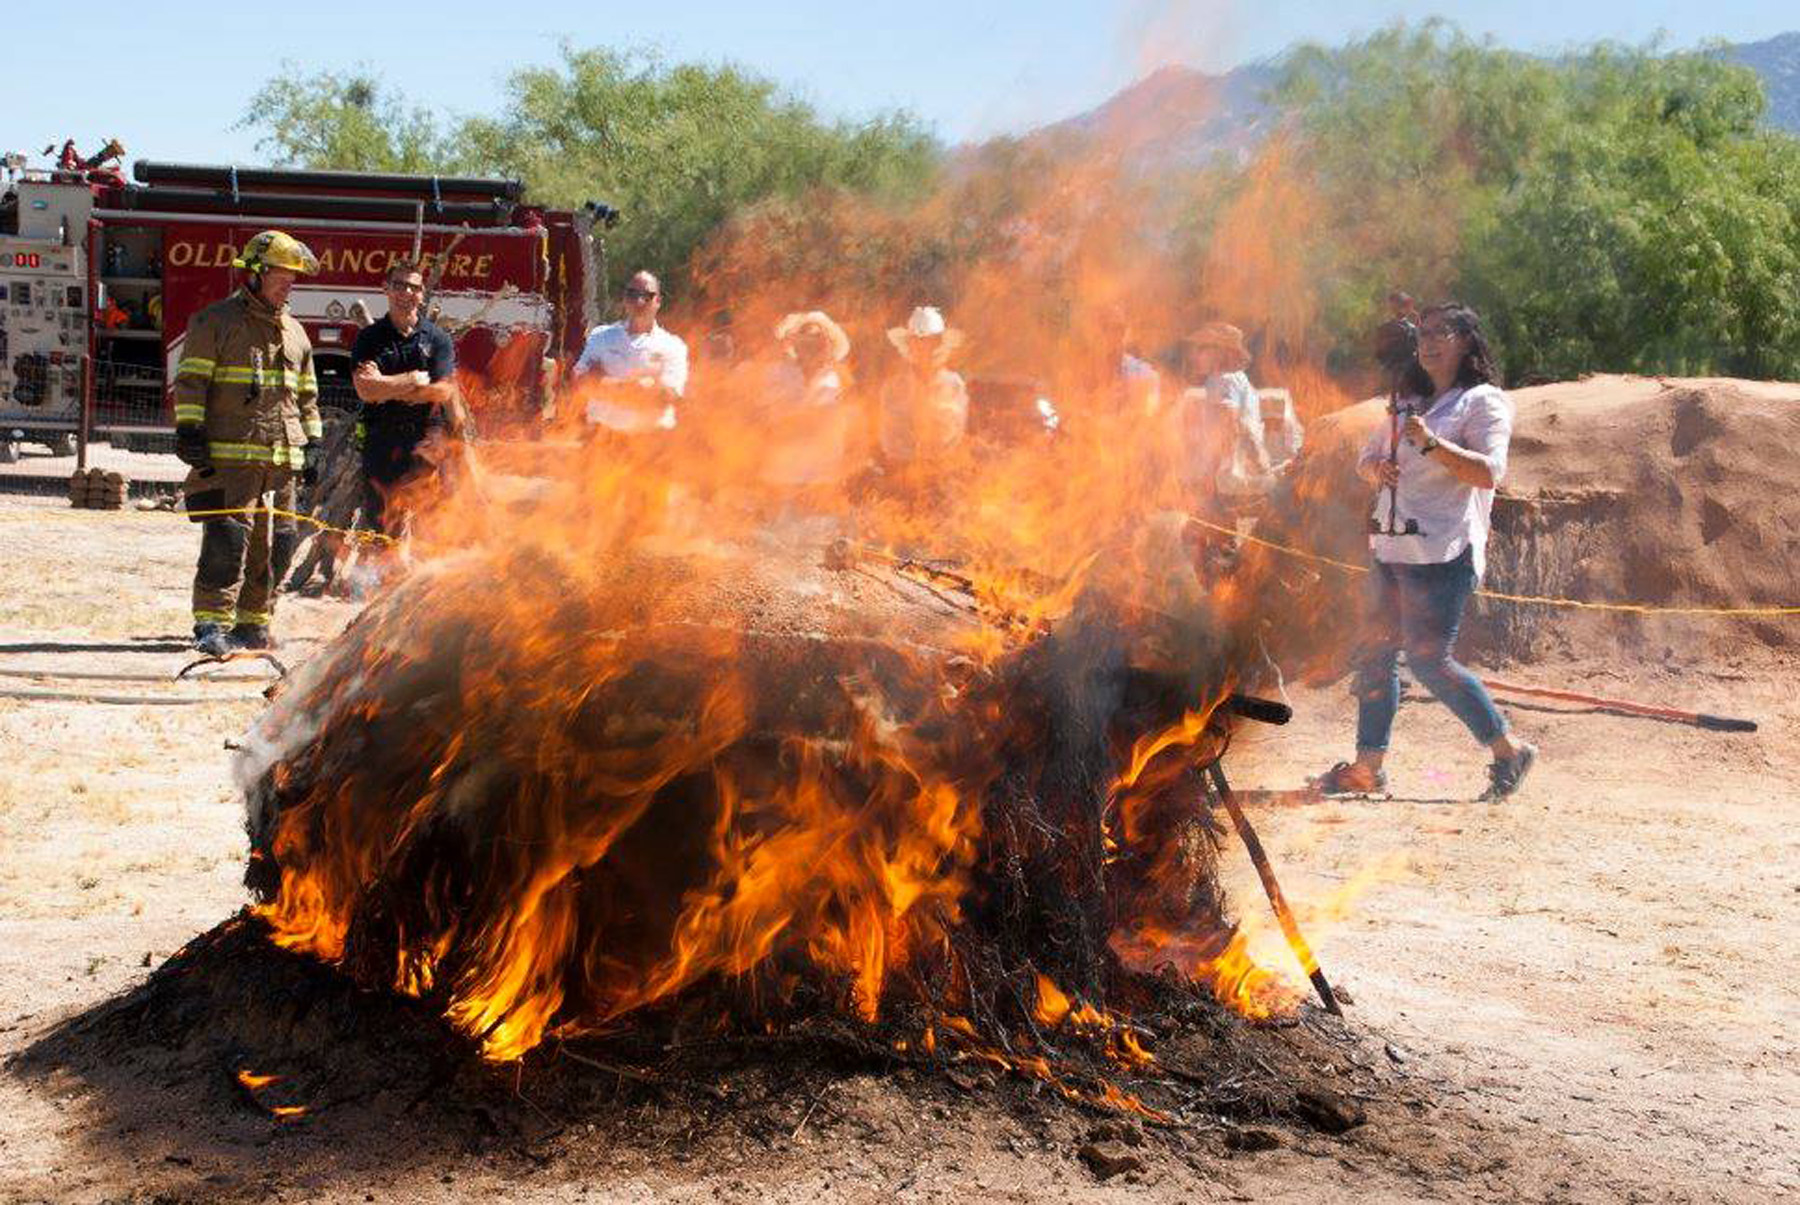
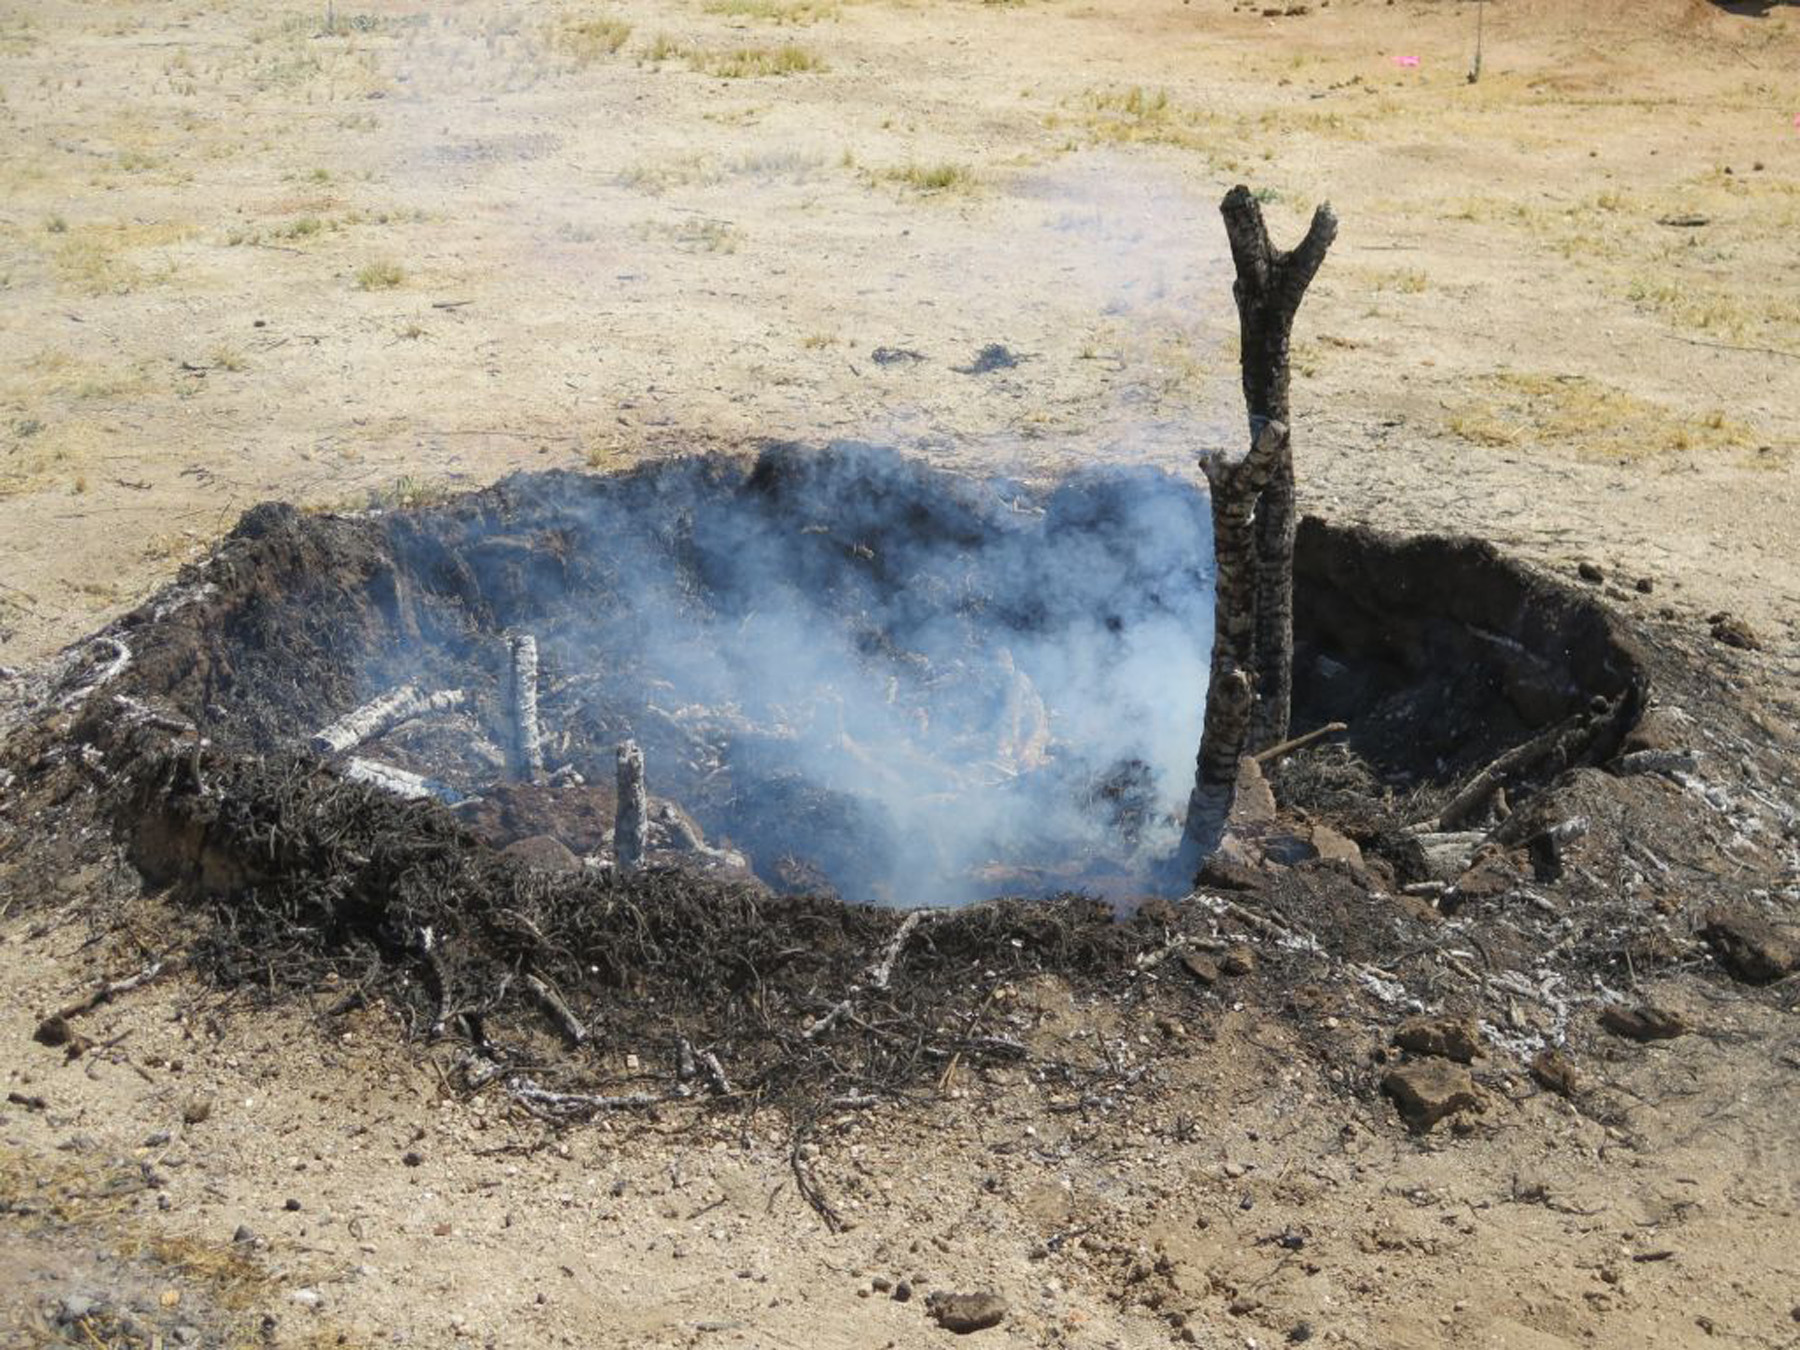
The internal fire temperature was at its hottest at this point, and then began to cool. The grass walls had burned out, and the heat began dissipating into the air. This image shows that the interior is still an inferno, but the fire quickly uses up the last of the grass fuel and burns the larger roof beams and five main support beams.

This image shows the fire burning the roof elements. I had laid a replica atlatl and darts on the roof before the burn.
This image shows the charred supports as they are about to collapse. Note the atlatl and darts still on the roof.

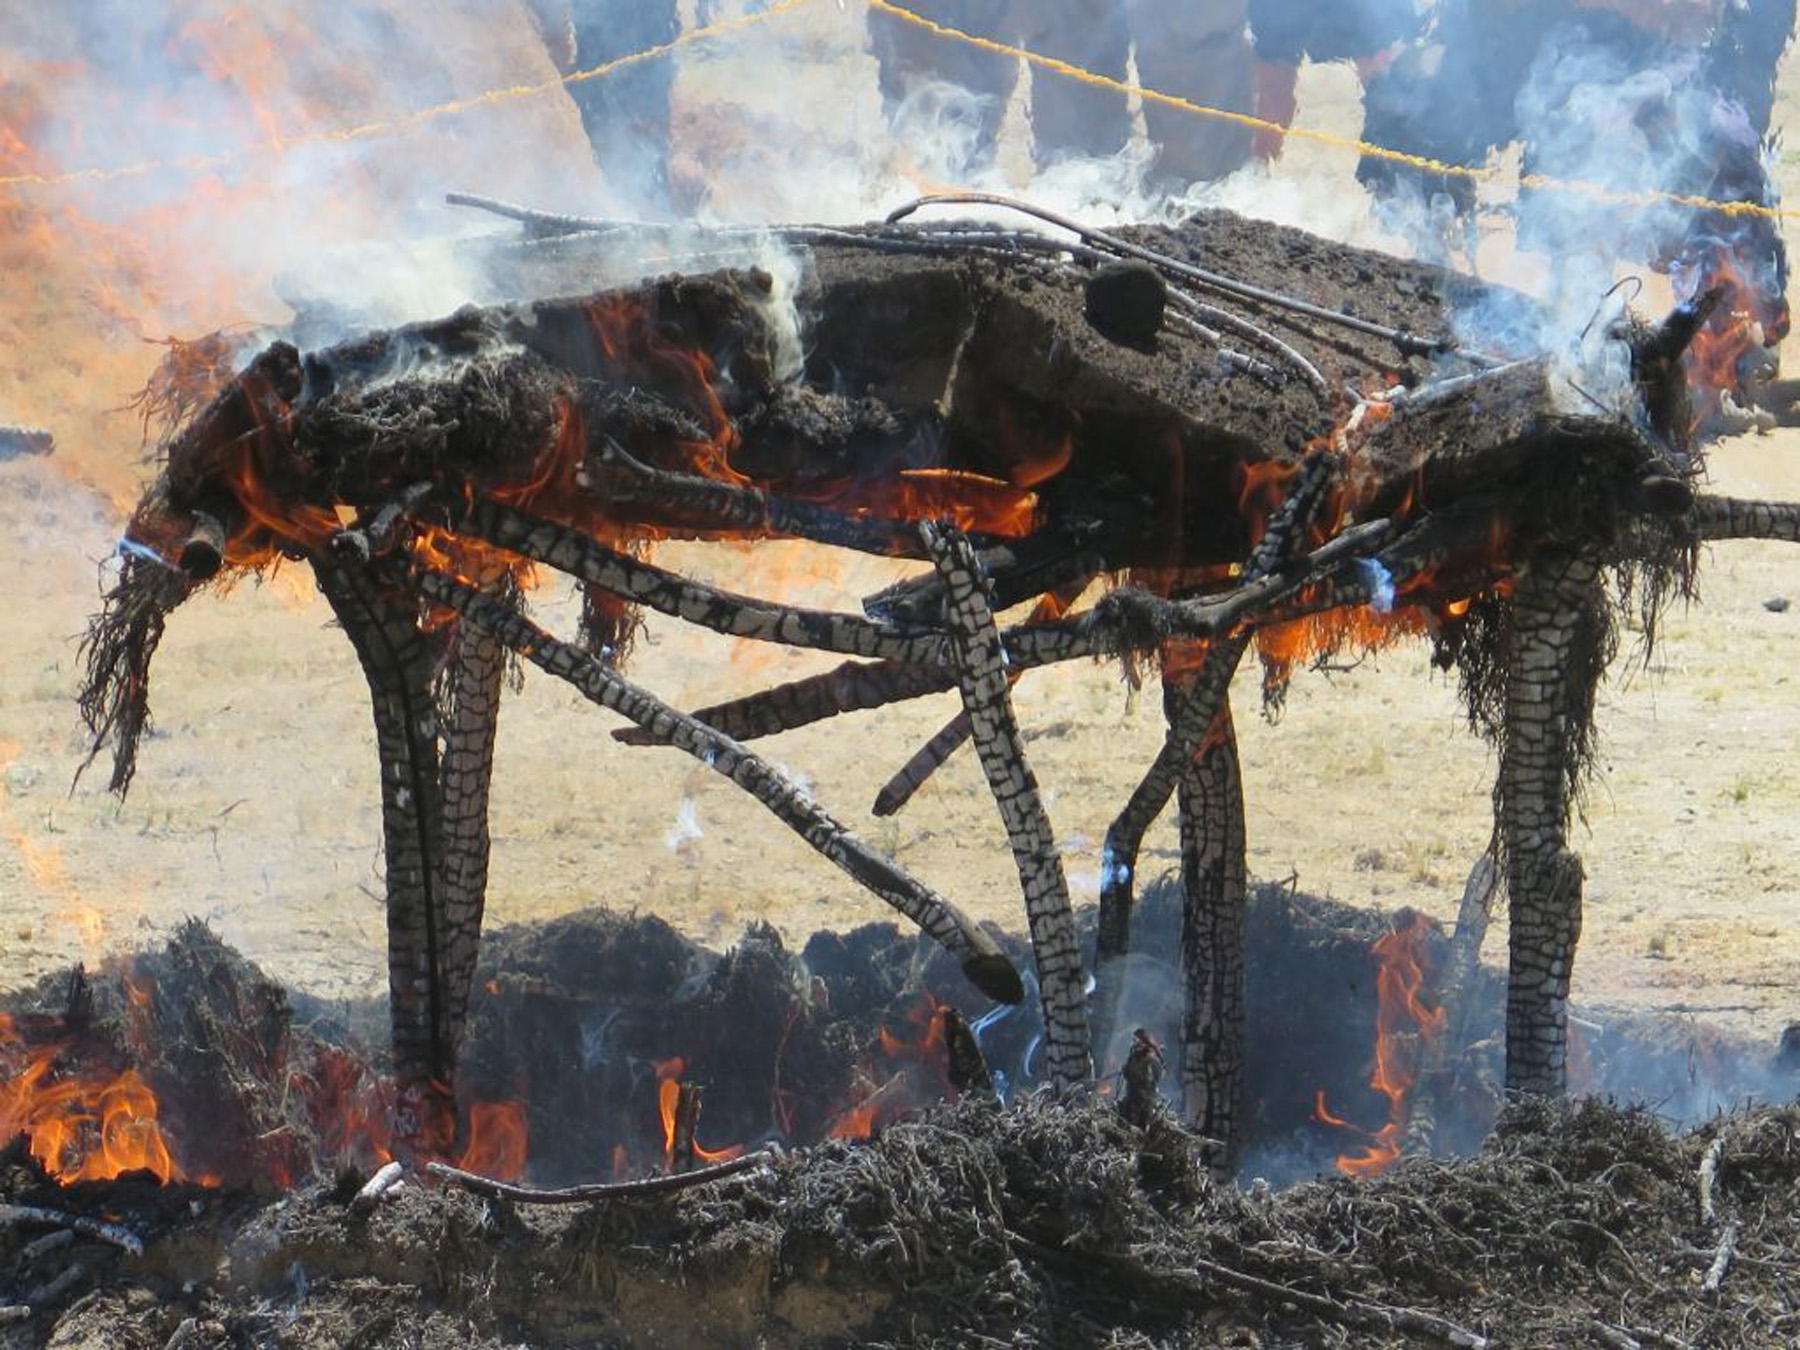
The roof collapsed about 7 minutes into the burn. The fire had started on top of thermocouple A next to the entry and spread out from there across the interior of the house. The west side was engulfed a few seconds longer than the east side, which caused the structural supports to start failing on the west side of the house first. This caused the roof to curl down and fold over into the west side of the house.

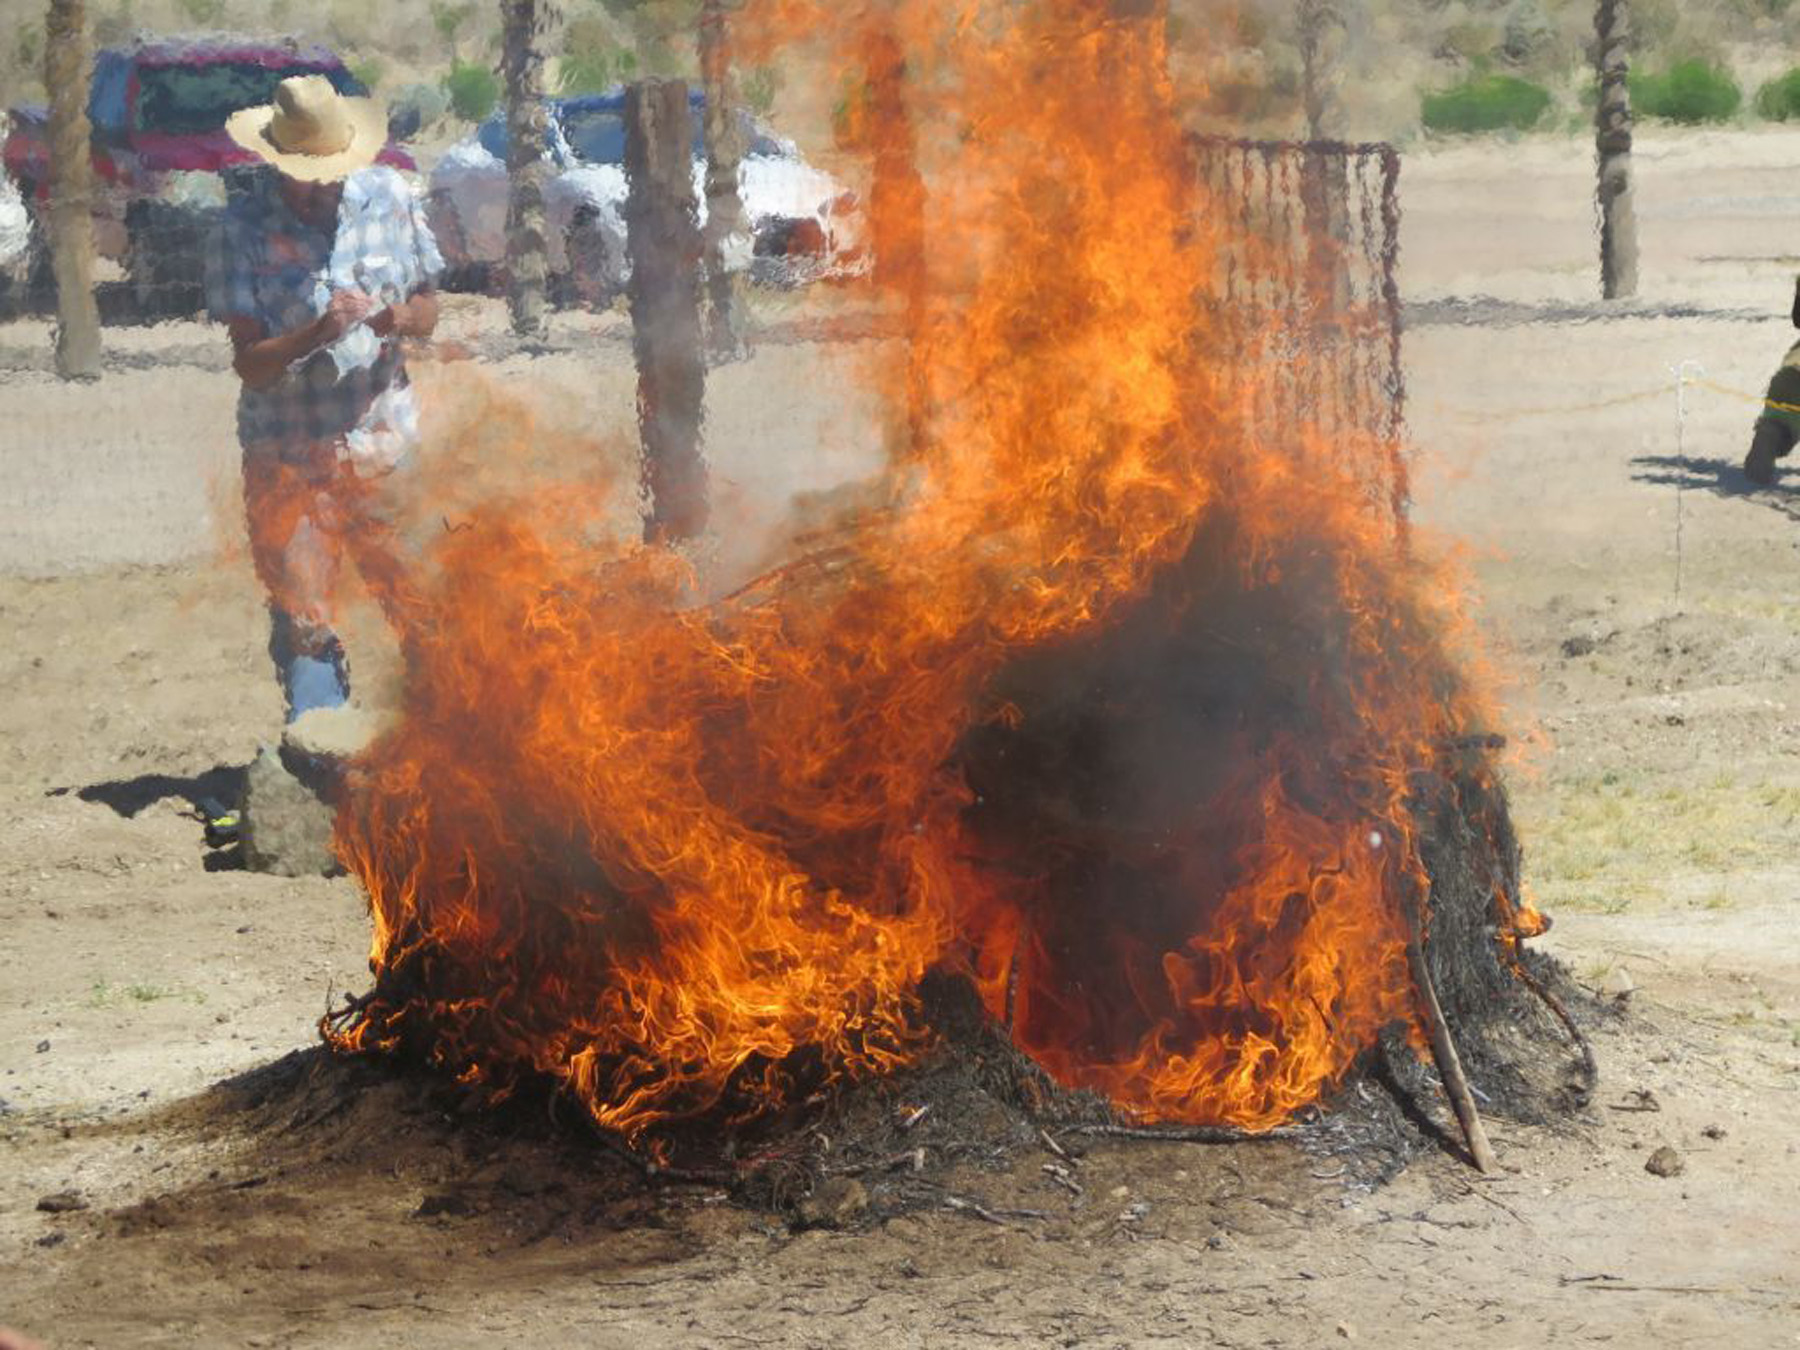
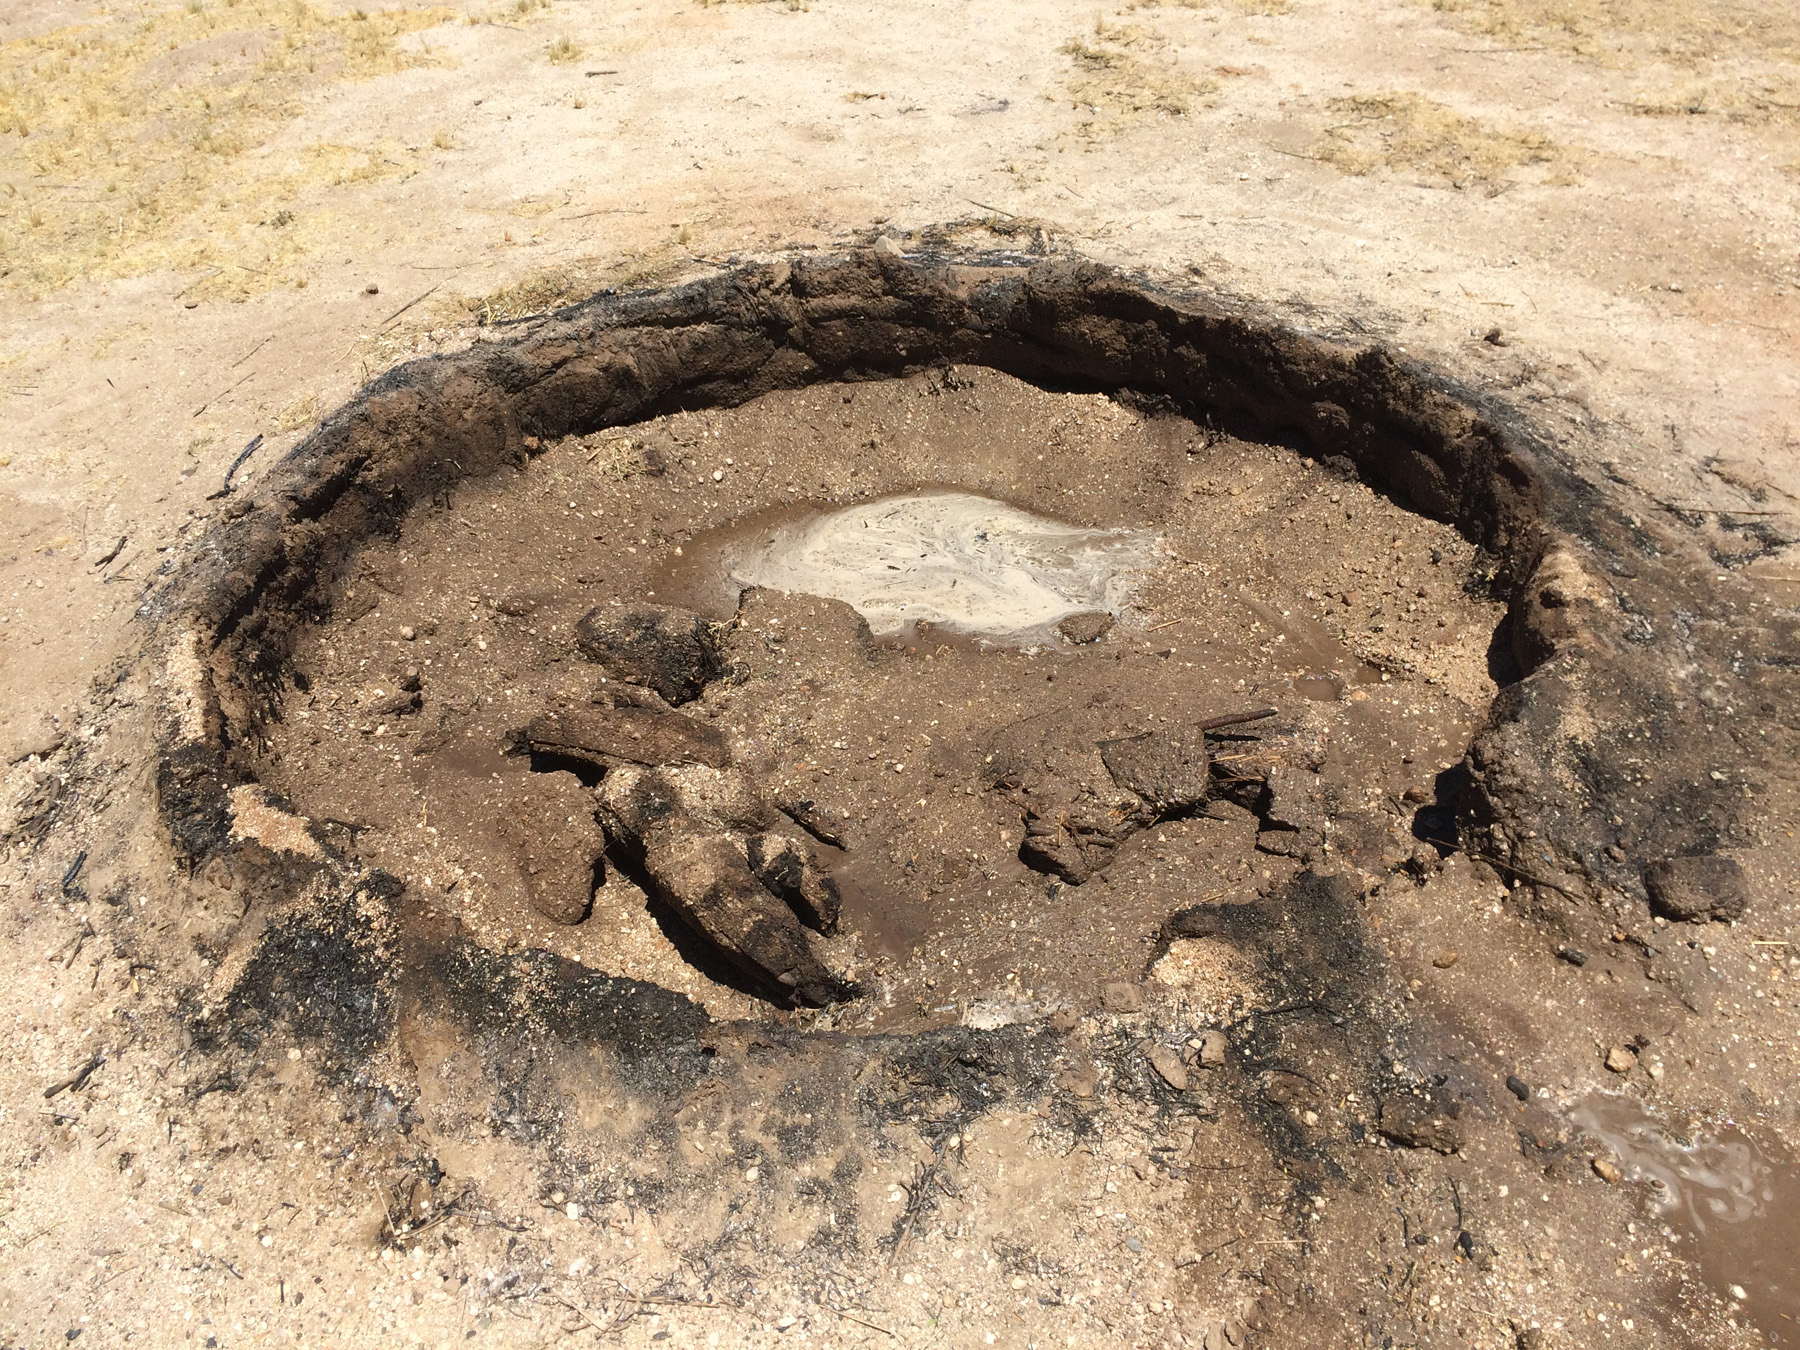
The lumps of scorched adobe flipped upside down as the roof curled over into the west side of the house. This allowed the roof beams to burn out, as well. It looks as though all of the support beams burned and we might not recover any identifiable elements of the superstructure when we excavate the area. There was a visible ring of burned grass thatching around the house pit up to its berm.

Floor temperature graph.

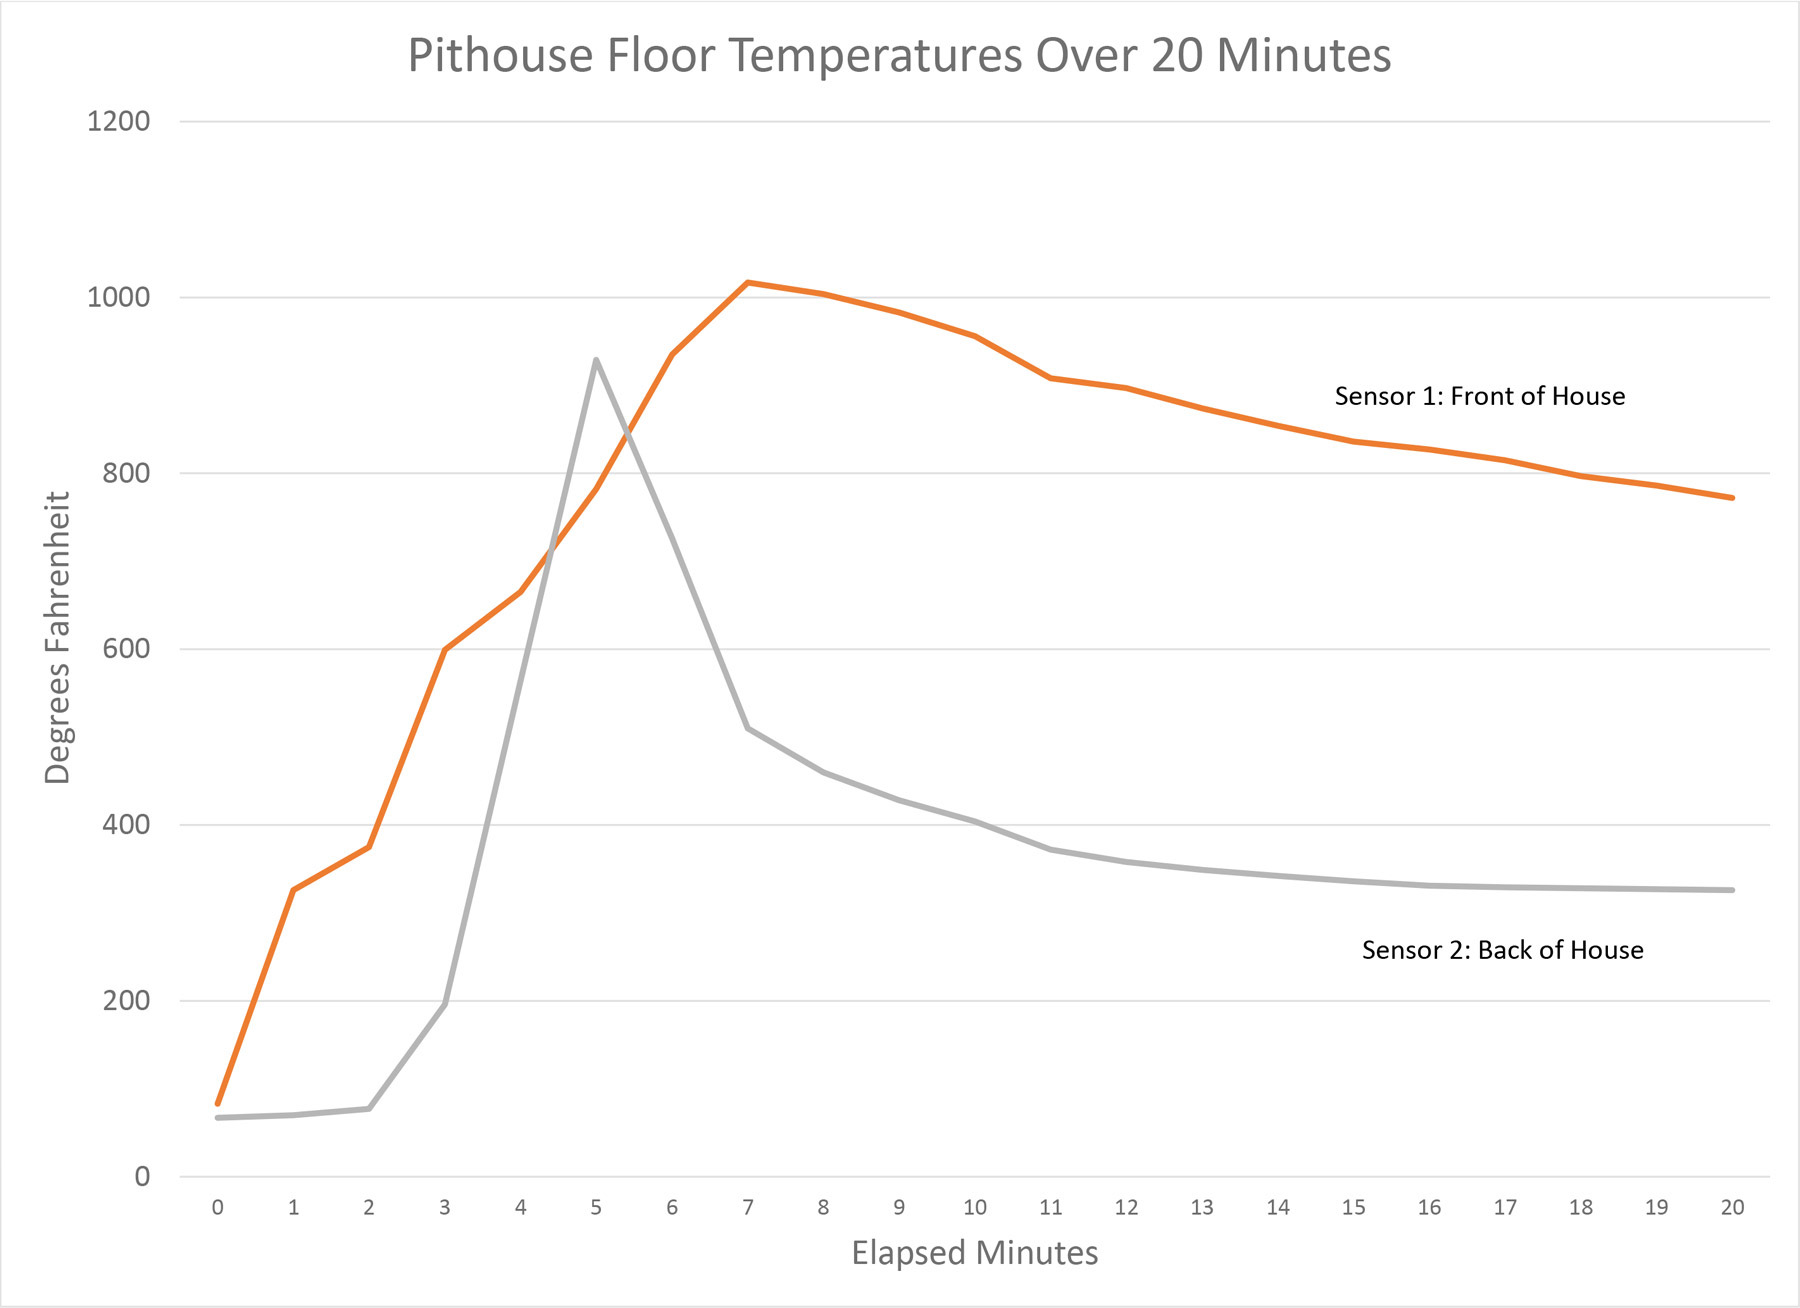
After about 25 minutes, the last of the main support beams burned out and fell into the house pit. The internal house temperature near the entryway was 722 degrees and dropping slowly. I allowed the house to smolder until 2:00 p.m., when I shoveled a thin layer of the sandy silts we had dug the house pit into over the interior of the house. I did not shovel any of this material over the lumps of roof fall.

This image shows the charred supports as they are about to collapse.
This image shows what was left of the house just before I buried it under a layer of sandy silts. You can clearly see the white ash of the burned-out main supports and roof beams. The black ash is mostly burned thatching. On the left side of the house, you can see lumps of burnt sediment from the layer capping the roof. The berm around the exterior of the wall is also clearly visible.

Here, you can see that some grass remained unburned, but most is charred and black. Some of this grass will probably be preserved and found when we excavate this house in a couple of years. You can also see impressions in a chunk of roof adobe that fell into the structure upside down. As the roof started to fall, it sloped to the west, where the supports had already begun collapsing.

This shows the area after I shoveled in the first layer of sandy, silty sediments to represent culturally deposited fill (sediment and trash that would have filled up the house remains as a result of people’s deliberate filling or general daily activities). These sediments had small flakes of tool stone mixed into them.


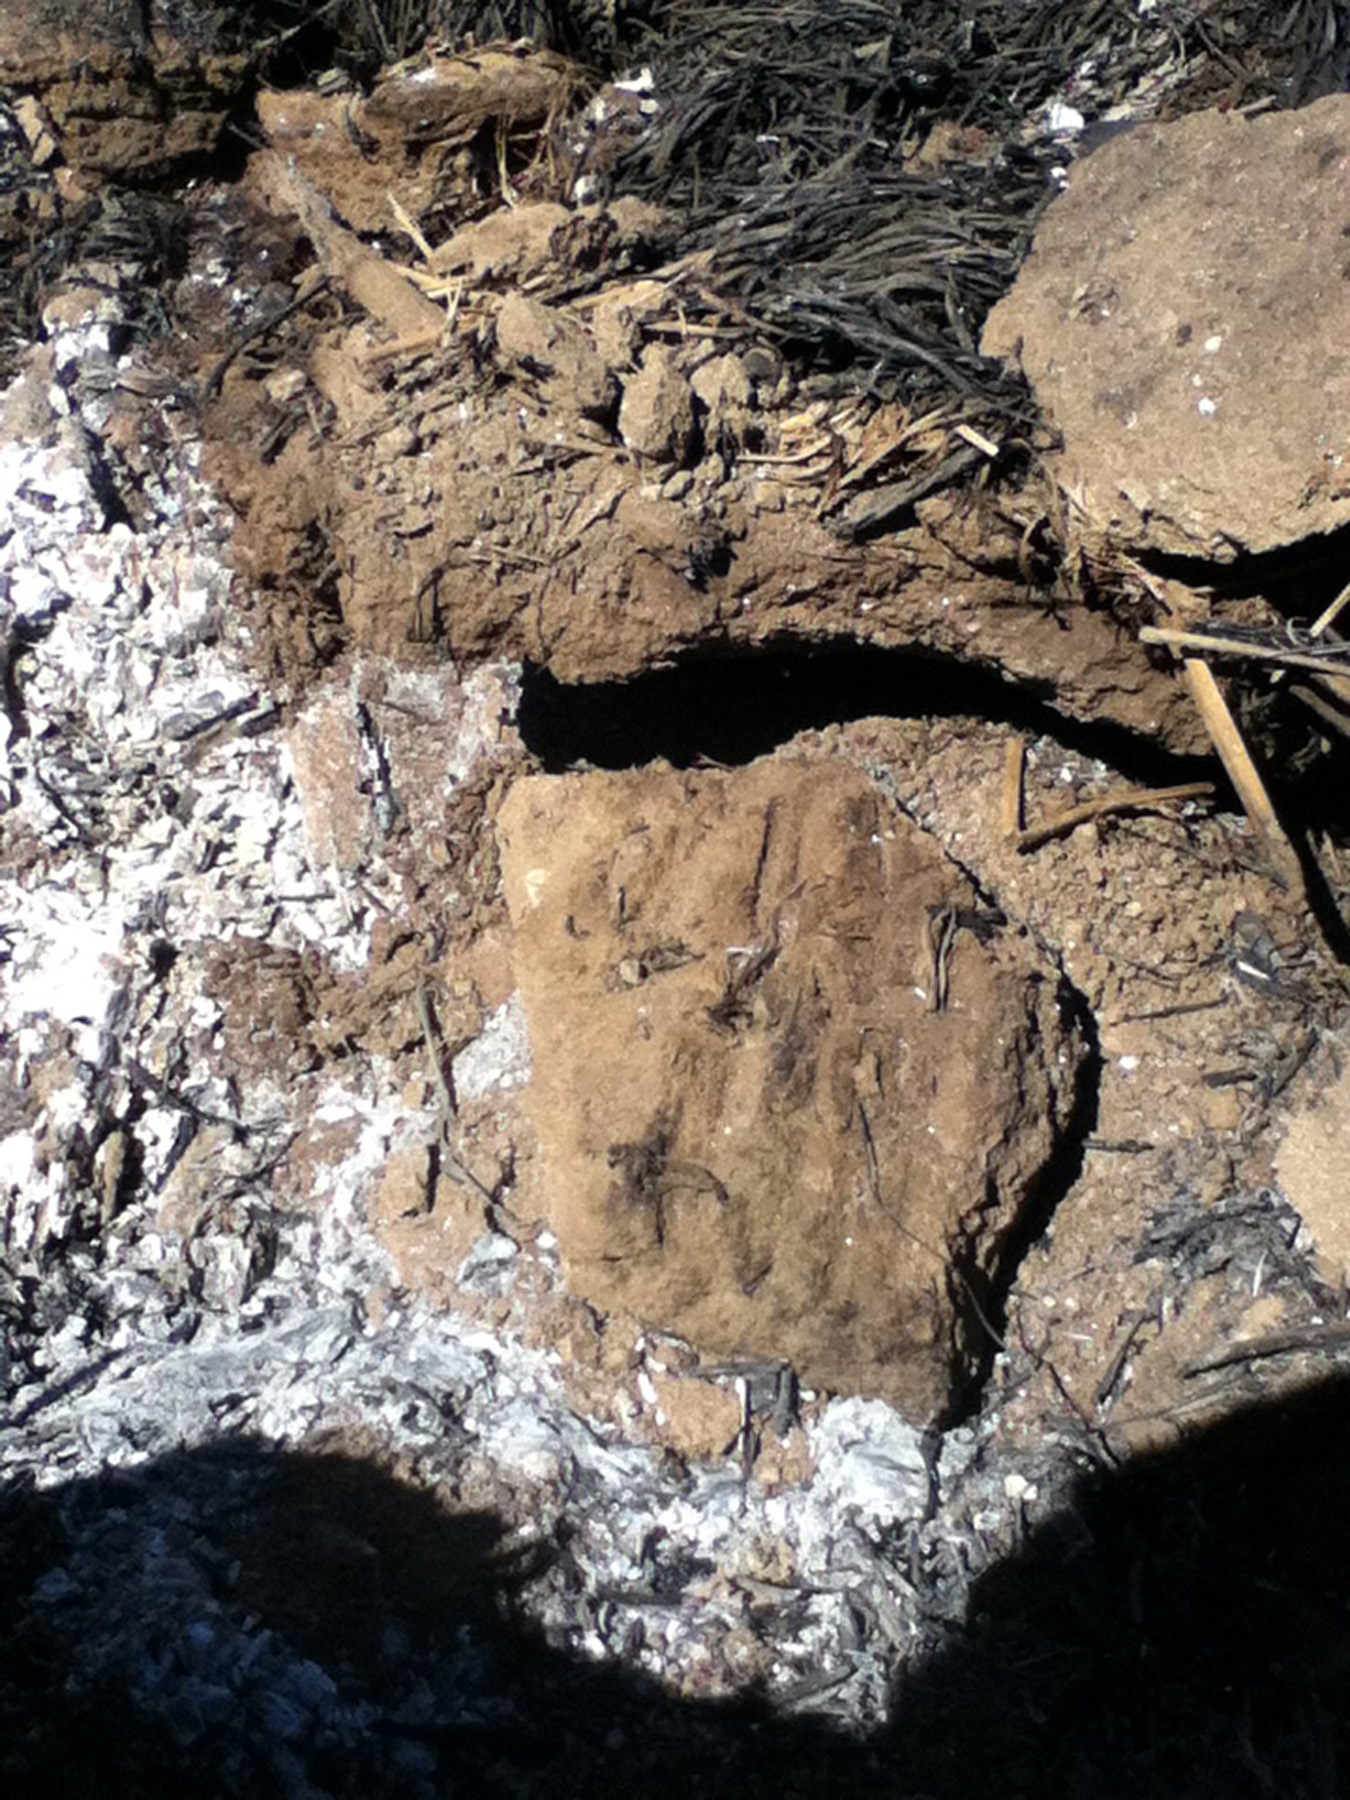
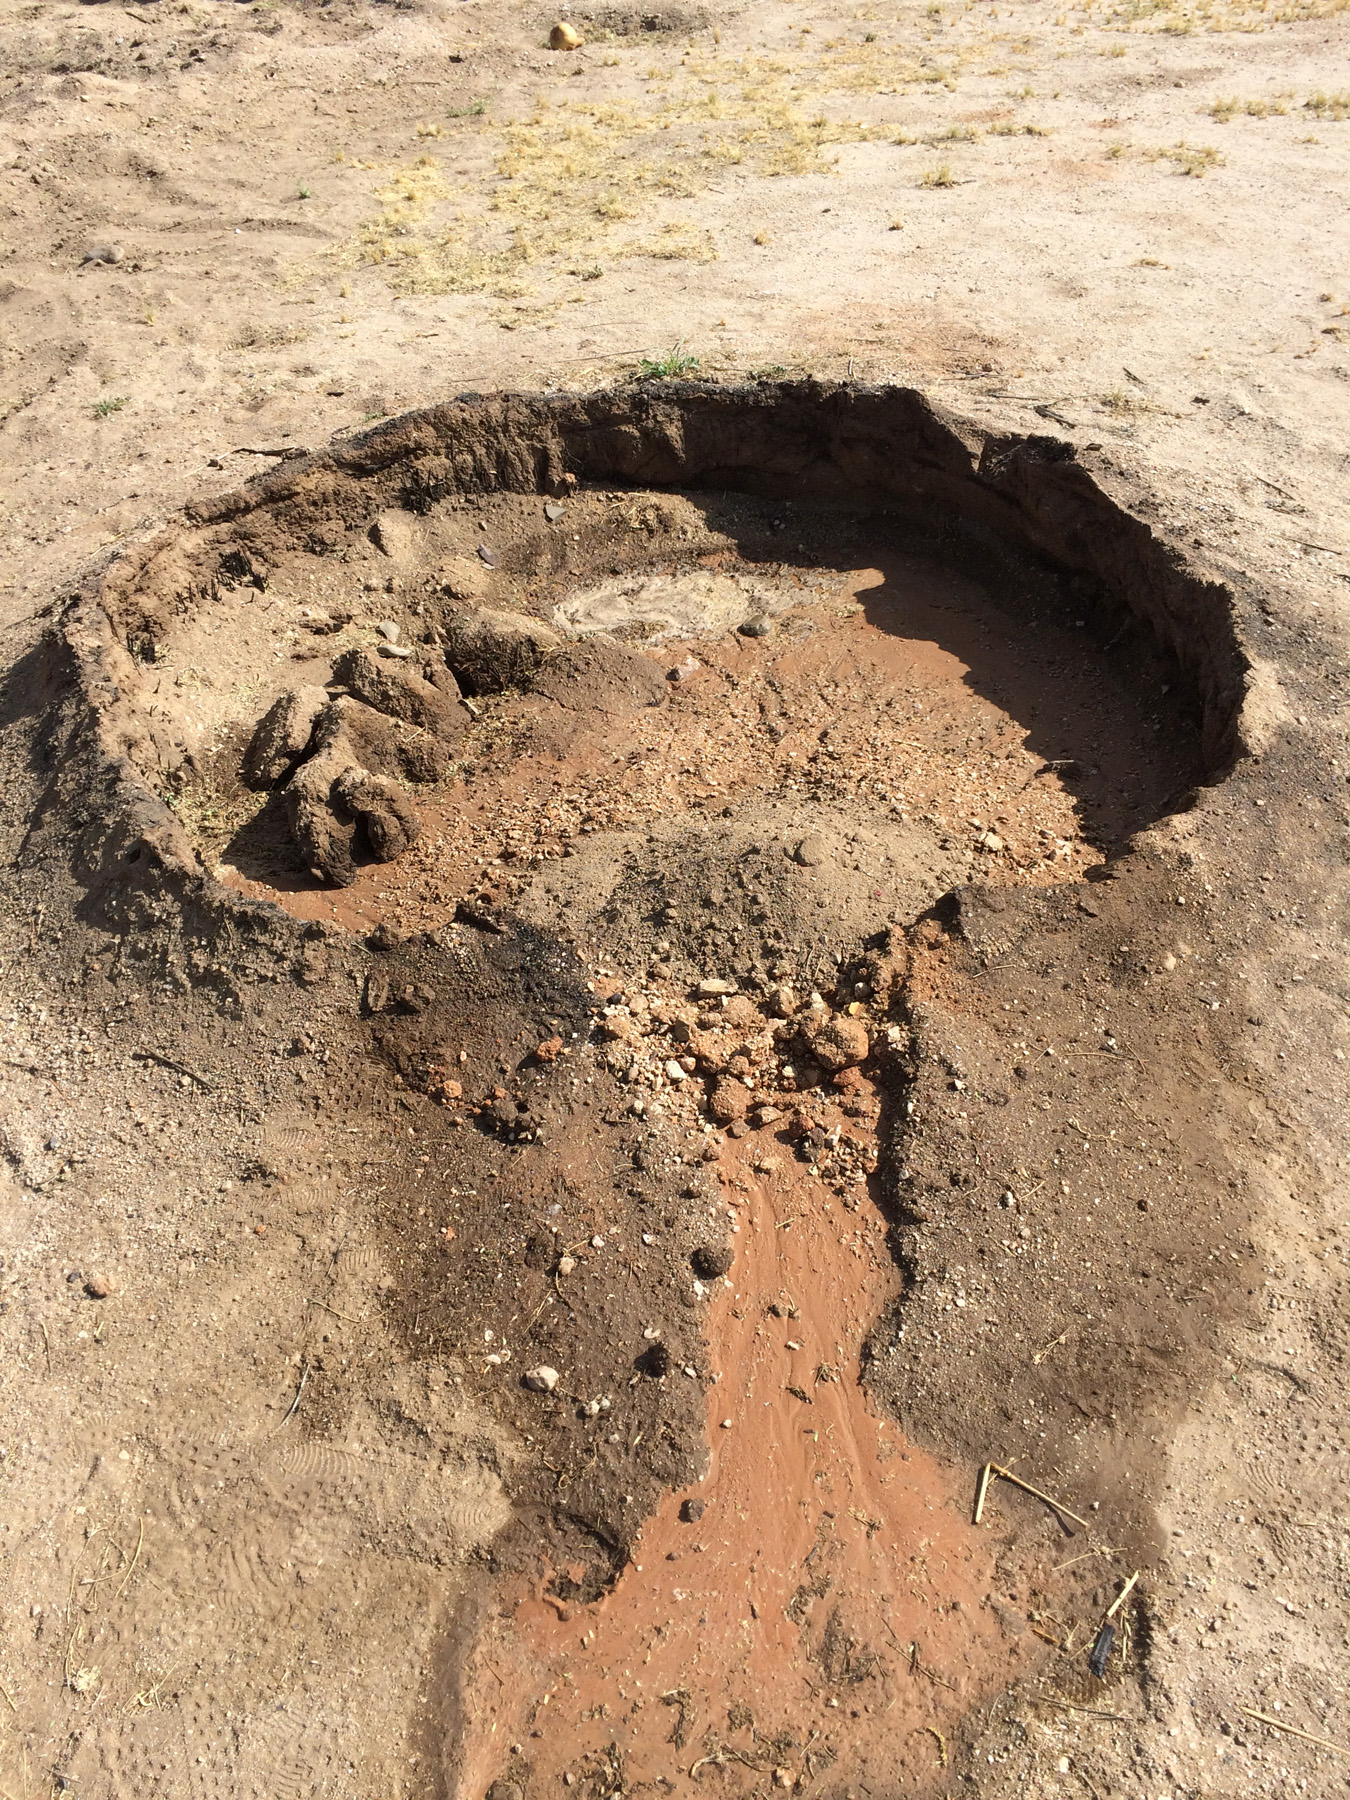
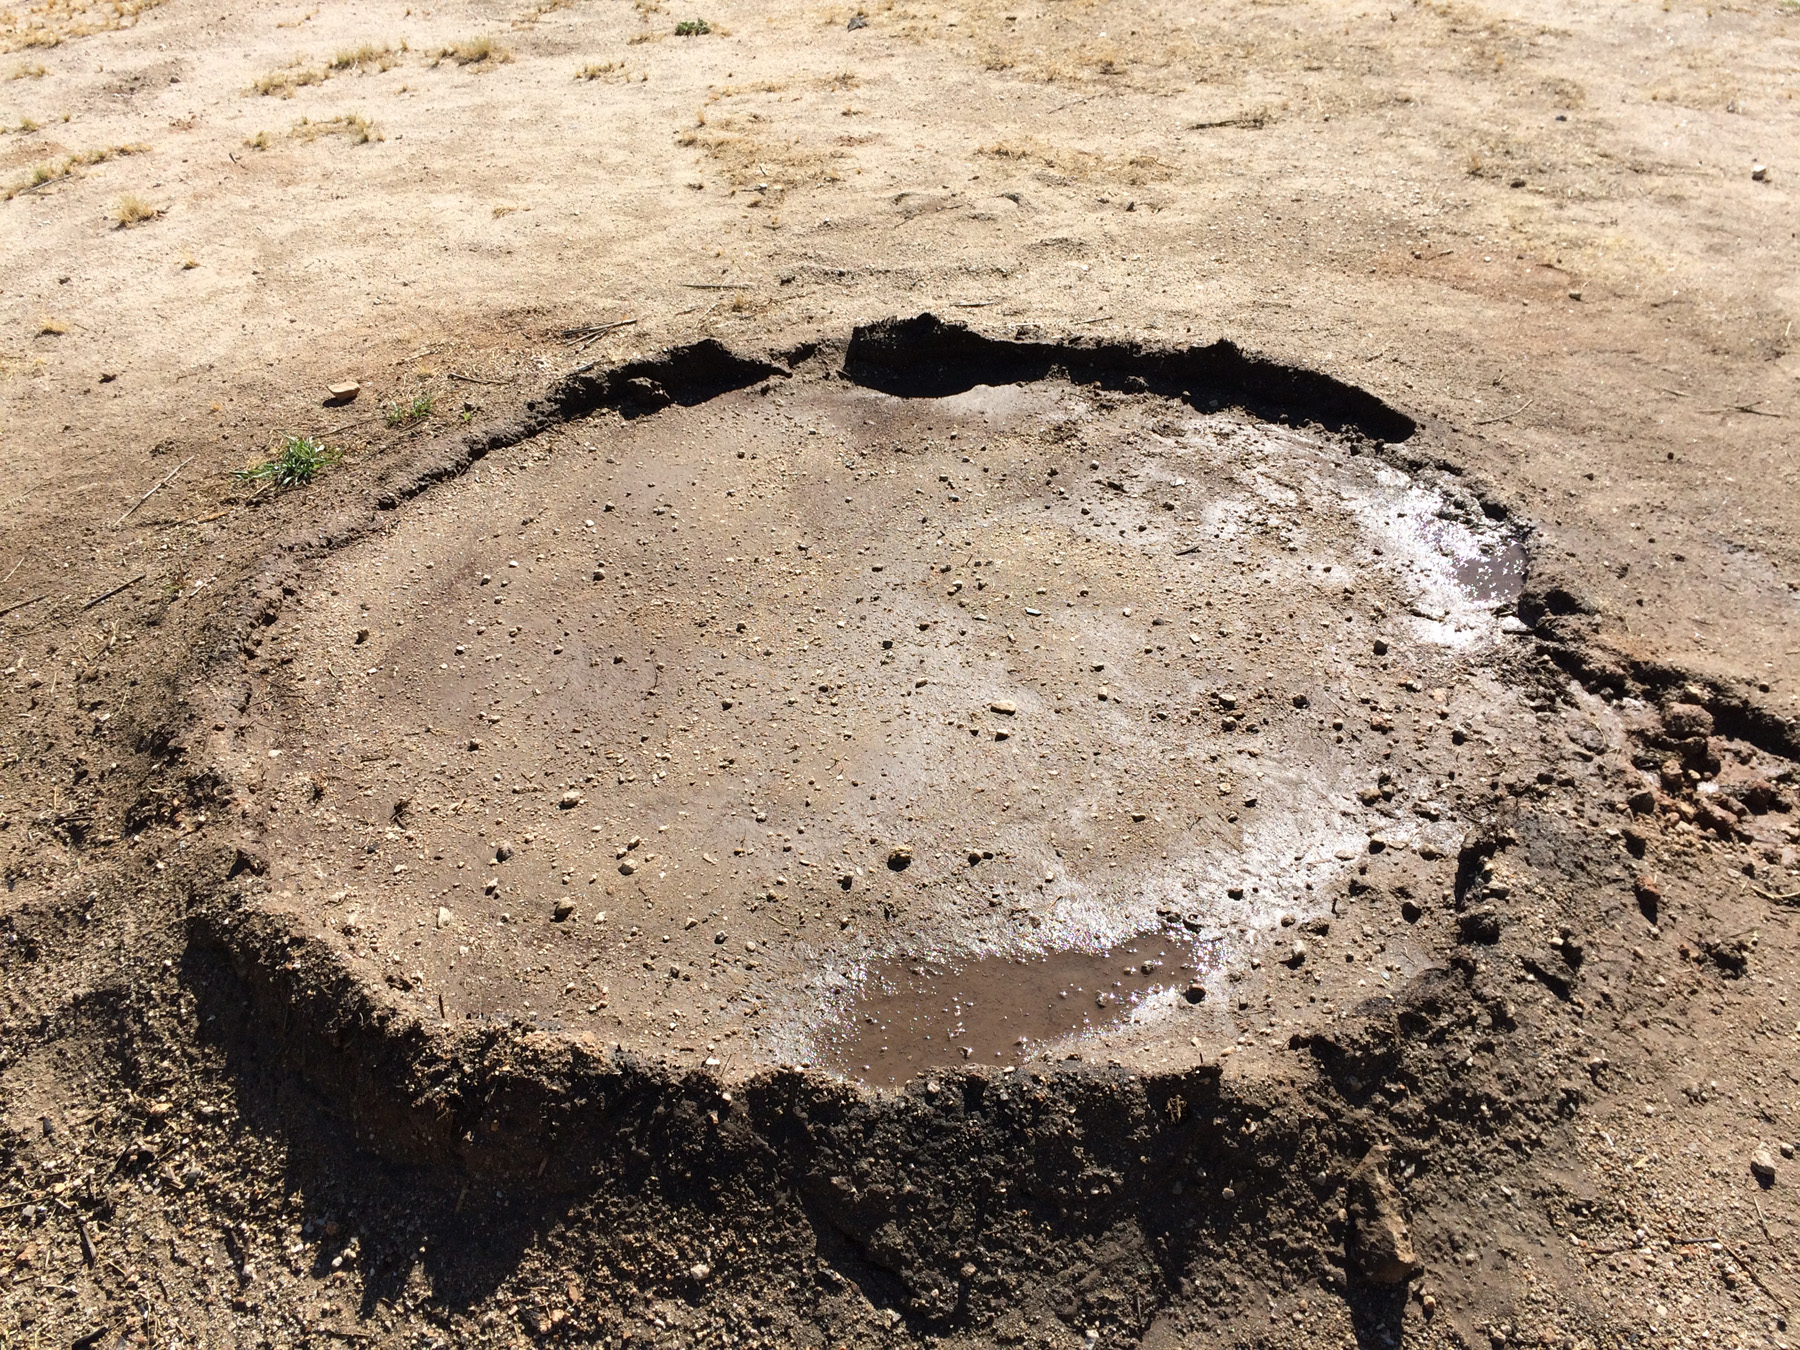
The next day, I tried to replicate naturally washed-in sediments. At the Los Pozos site, we often encountered features with natural water-lain sediments and layers of culturally deposited trashy fill, or even simpler deposit dirt.

Water lain sediments Hosing in Sediments

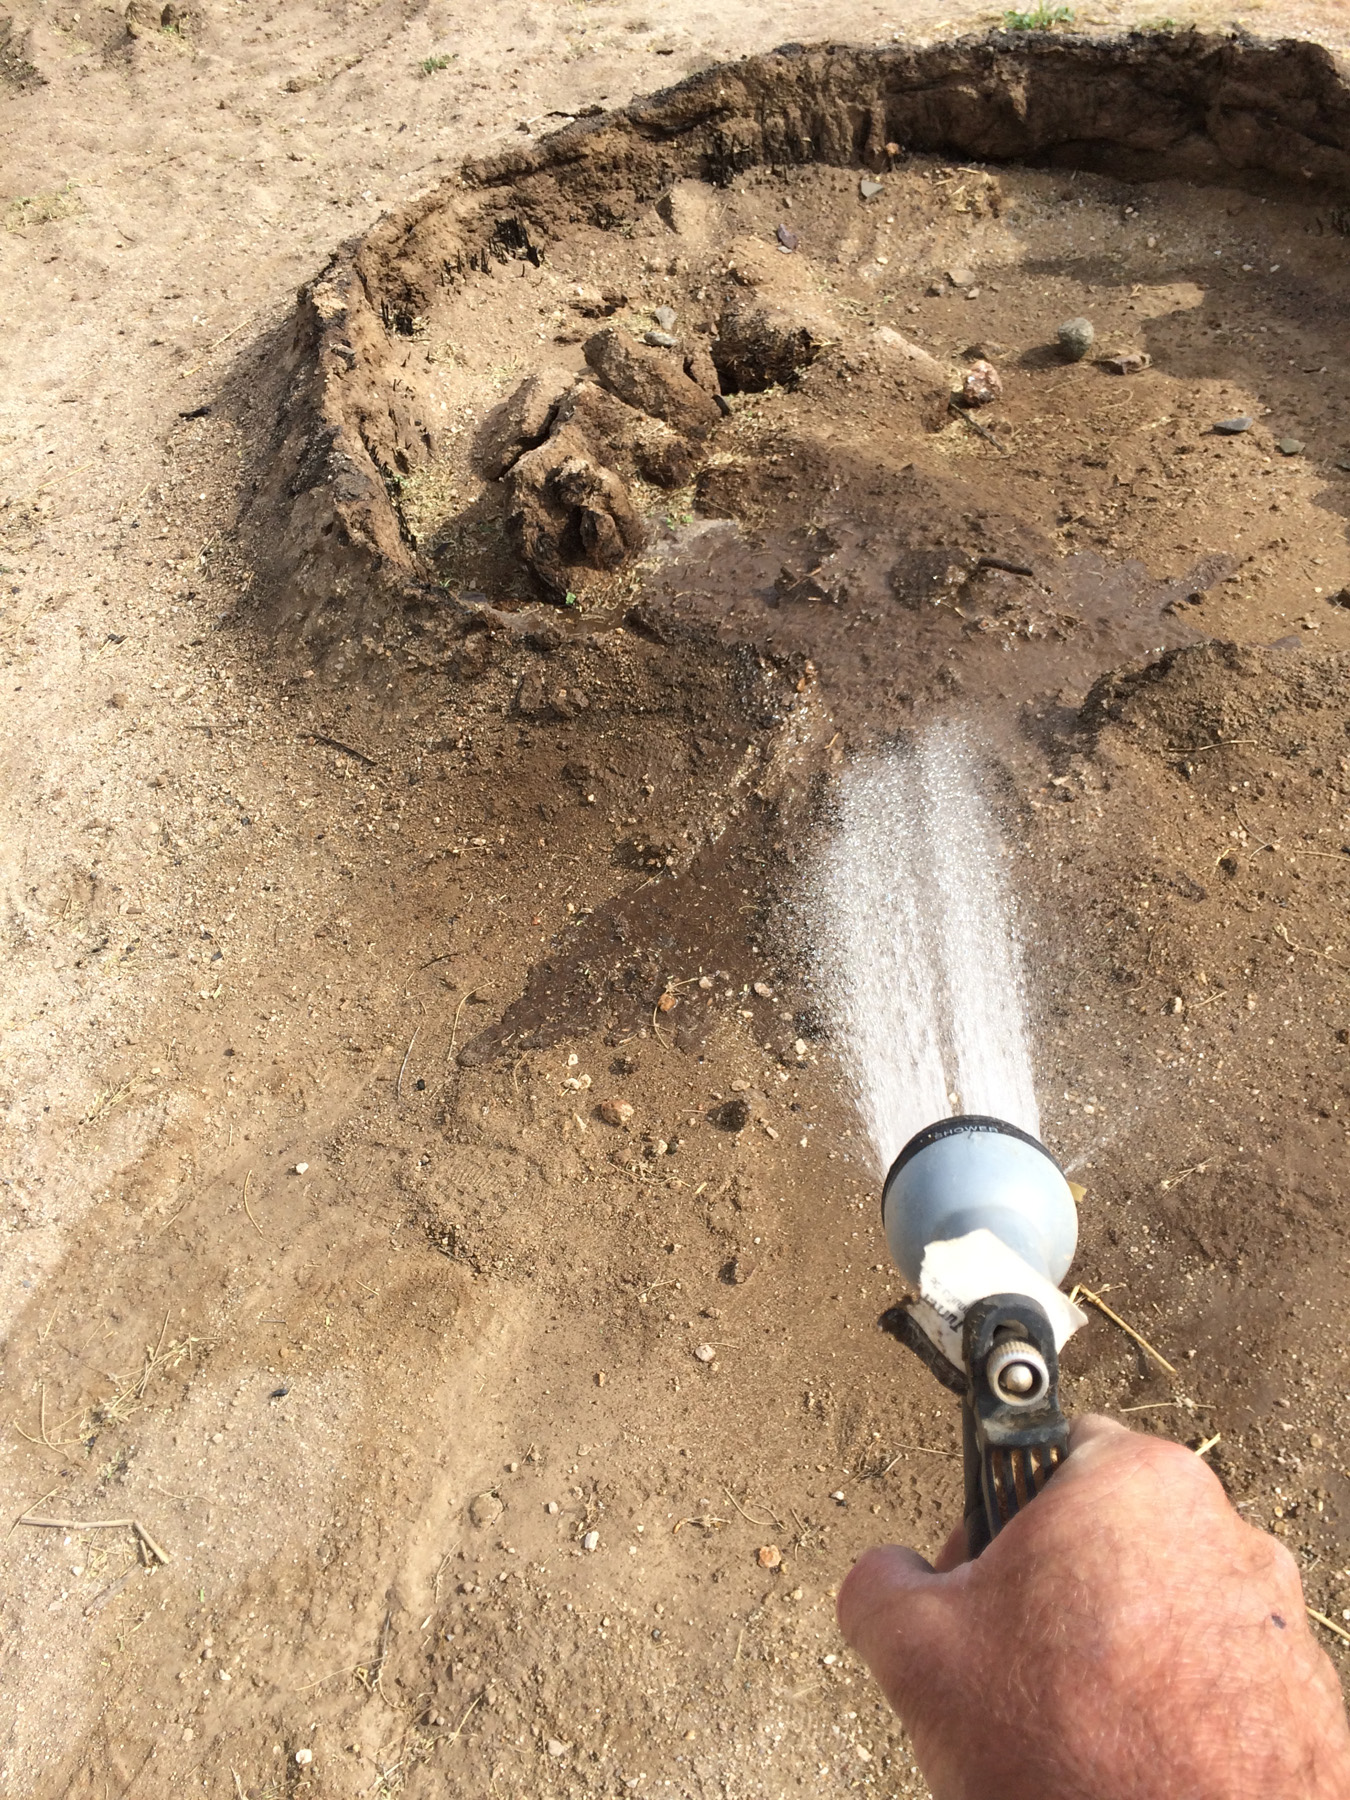
I used a garden hose to wash sediments into the house from the location of thermocouple A. I shoveled up a small mound and then washed it into the house. I also shoveled in some clean sands to create layers. Soon I started adding in lenses of red argillitic (clay-rich sediments) to add to the contrast. My goal was to mimic sediments archaeologists have encountered when investigating similar houses.

Here, note the burned adobe lumps at upper left; the mound of sandy silts at center; and in the foreground, the notch in the wall through which I washed in the sediments.

Ultimately, I filled in the pit to about 10 centimeters above the modern ground surface, which still left about 2 centimeters of berm exposed in places.

Filmmaker Victoria Rendón was on site recording the burn, and she undertook interviews with participants and archaeologists. She is currently creating a short film that we look forward to sharing with you—stay tuned!

Special thanks to archaeological fire expert AJ Vonarx for her donation of thermocouples and thermostats.

3 thoughts on “Burning Down the (Pit) House, part 1”

  1. Vincent Murray says:
    May 22, 2017 at 6:29 pm

    What a great experiment!

  2. Sharon Miller says:
    May 31, 2017 at 3:29 pm

    This was an absolutely fabulous exhibition. Thank you for sharing preservation archaeology with the public.

  3. Al and Linda Wendler says:
    June 7, 2017 at 9:37 am

    This was an unexpectedly amazing event. Hard to explain why we had so much fun to outsiders, but we did. Breakfast was pretty dang good too. Thanks for everything.

Comments are closed.

Explore the News

  • Preservation Archaeology Blog
  • Press Releases/Announcements
  • Preservation Archaeology Today
  • Join Today

    Keep up with the latest discoveries in southwestern archaeology. Join today, and receive Archaeology Southwest Magazine, among other member benefits.

    Become A Member

Want to help us? Make a donation

or take action

Cyber SouthwestRespect Great BendHands-On ArchaeologySave History

© 2025 Archaeology Southwest

520.882.6946
Contact
  • My Store Account
  • Contact Us
  • Terms of Use
  • Privacy Policy
  • Press Room